As the cost of living continues to rise, more individuals are seeking innovative ways to earn extra income on the side. These additional sources of revenue, commonly referred to as “side hustles,” can include anything from mowing lawns for friends and family to selling items on eBay, creating online content, drop-shipping, becoming an influencer, and more. While this supplementary income can be a welcome boost, it’s crucial to understand when you need to report your earnings from your side hustle for tax purposes.
The first step is to determine whether or not you are operating a business. The Australian Taxation Office (ATO) has provided a list of questions that can assist you in making this determination. These questions include:
Do you intend to operate a business?
Do you have the intention and prospect of earning a profit from your activities?
Is the size or scale of your activity sufficient to generate a profit?
Are your activities continuous and repeated?
Are your activities planned, organised, and conducted in a business-like manner? For example, do you:
Keep business records and maintain a separate business bank account?
Advertise and sell your goods and services to the public, rather than just to family or friends?
Operate from business premises?
Maintain any necessary licences or qualifications?
“Typically, a business involves a series of continuous and repeated activities that you undertakewith the intention of generating a profit.Profit can take the form of money, but it can also be earned through other means, such as receiving goods or services (such as a barter deal). A one-time transaction may also qualify as a business if it is either:
intended to be repeated
the first step in starting a business.
You can operate one or multiple businesses simultaneously.“
In essence, if you are attempting to earn a profit from your side hustle, rather than simply supplementing your overall income, there is a strong possibility that you are operating a business. If this applies to you, the next step is to seek advice on your obligations regarding reporting your income and whether or not you need to register for GST and obtain an ABN. We will cover this topic in our next blog.
In this blog I will show you how to set up a fully serviced novated lease for a motor vehicle in Xero. Before I begin, I would like to make it clear that every novated lease arrangement is different, depending on the agreement made between the employee and the lease provider. If this “how to” does not seem to match up with your requirements, please seek further advice from your tax agent or the lease provider. I will not be providing advice to readers about their individual requirements for their novated lease set ups, so please don’t ask! Again, seek advice from your tax professional or the lease provider company if you need help.
What is a Novated Lease?
Before diving into the “how-to” of this blog, it’s important to understand what a novated lease is. A Novated lease itself is a type of vehicle financing arrangement involving an employee, their employer and a leasing provider. Essentially, an employee is able to purchase a vehicle AND receive tax concessions under a salary sacrifice arrangement, orchestrated through payroll. Simply put, “to novate” means “to move with,” and in the context of a novated lease, it signifies that the employee’s vehicle and lease agreement can move with them if they change employers.
How a Novated Lease Works
Basically, a novated lease occurs as per the below steps:
An employee chooses a vehicle to buy.
A Leasing Provider provides a lease agreement to the employee which sees the employer take over the rights and obligations under the lease via a “deed of novation”. It should be noted that the deed of novation includes a clause that transfers the lease obligations back to the employee on termination of the lease or when the employee ceases employment with the employer.
The employee and employer enter into a salary sacrifice agreement whereby deductions are taken from the employee’s pay to fund the lease.
The employer pays the leasing provider with the payroll deduction funds. This means the employer is not out of pocket, both from a cash flow and tax perspective.
What is a Fully Serviced Novated Lease?
In this scenario, another party is introduced – a salary packaging provider. This provider will send the employer a reconciliation report the compares the actual motor vehicle costs against the novated lease estimated costs. If there is any variance, an adjustment must be made to the employee’s pre-tax deduction and sometimes, an adjustment is also required to the post-tax deduction.
A fully serviced novated lease includes, not only the lease repayments, but also other vehicle expenses such as:
Insurance
Maintenance like servicing, repairs and parts
Registration
Fuel
Roadside Assistance
Tolls
Car washing
This type of novated lease operates in the same way as described above, however it has an extra component which is FBT. The post-tax deduction is known as an Employee FBT Contribution which attracts GST. The employer also claims the GST on the novated lease expenses. The pre-tax deduction is calculated as the novated lease expenses minus the post-tax deduction (GST exclusive).
How to Set up the Fully Serviced Novated Lease in Xero
This “how to” will be based on the following novated lease example:
Sonia works for ABC Industries and is paid $120,000 plus super per annum on a monthly pay cycle. She decides to purchase a vehicle costing $60,000 and asks her employer if she can salary sacrifice the purchase via a fully serviced novated lease. Sonia’s employer agrees with the request and asks Billy’s Novated Lease Services to assist with the facilitation of the lease. Once the lease is in place, Billy’s Novated Lease Services provides the following information to ABC Industries:
The novated lease will be for 5 years and based on the following estimated costs, the fixed monthly amount will be $2,017.08. See the details below:
ITEM
GST Exclusive
GST
TOTAL
Lease Payment
14,000
1,400
15,400
Fuel
3,000
300
3,300
Servicing & Repairs
2,000
200
2,200
Registration
900
0
900
Insurance
1000
85
1085
Roadside Assistance
500
50
550
Tolls
400
40
440
Car Wash and Vacuum
300
30
330
TotalEstimated Annual Costs
22,100
2,105
24,205
Monthly Novated Lease Amount
1,841.66
175.42
2,017.08
The fringe benefit figure and related pre and post tax figures are also provided to ABC Industries as below:
The following steps will need to be actioned in order to set up the above lease in Xero:
Step 1 – Add the following accounts to the Chart of Accounts
Novated Lease Clearing Account – liability account, current liability; – BAS Excluded tax code; set up a separate account for each affected employee.
Novated Lease Expenses – expense account – BAS Excluded tax code; put under payroll costs like wages or super etc.
Employee FBT Contributions – revenue account – GST on Income tax code; place under non-trading income type e.g. “Other Income”
Fringe Benefits Tax – needed if an FBT liability arises; expense account – BAS Excluded tax code; place under general overheads.
Step 2 – Set up the payroll tax deductions
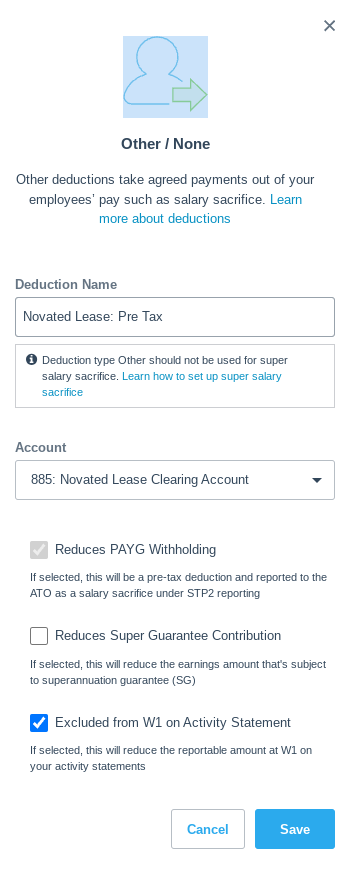
Pre-Tax Novated Lease Deduction – reduces PAYG WH; may or may not reduce SG (but shouldn’t); excluded from W1; STP – Salary Sacrifice – Other Employee Benefits (type O); direct this deduction to the Novated Lease Clearing Account.
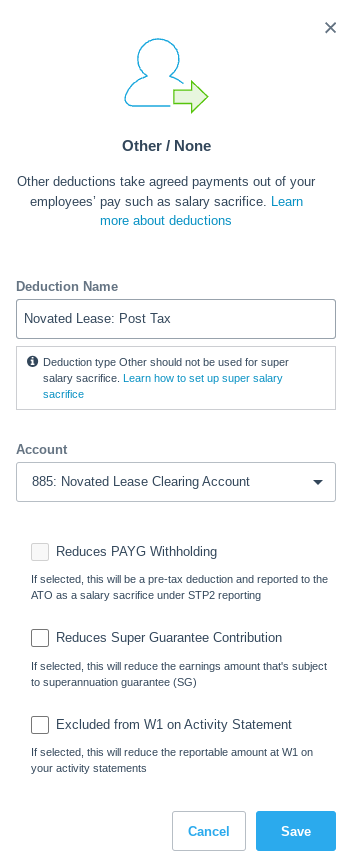
Post-Tax Novated Lease Deduction – Does not reduce PAYG WH; Does not reduce SG; Is not excluded from W1; STP – not reportable; direct this deduction to the Novated Lease Clearing Account.
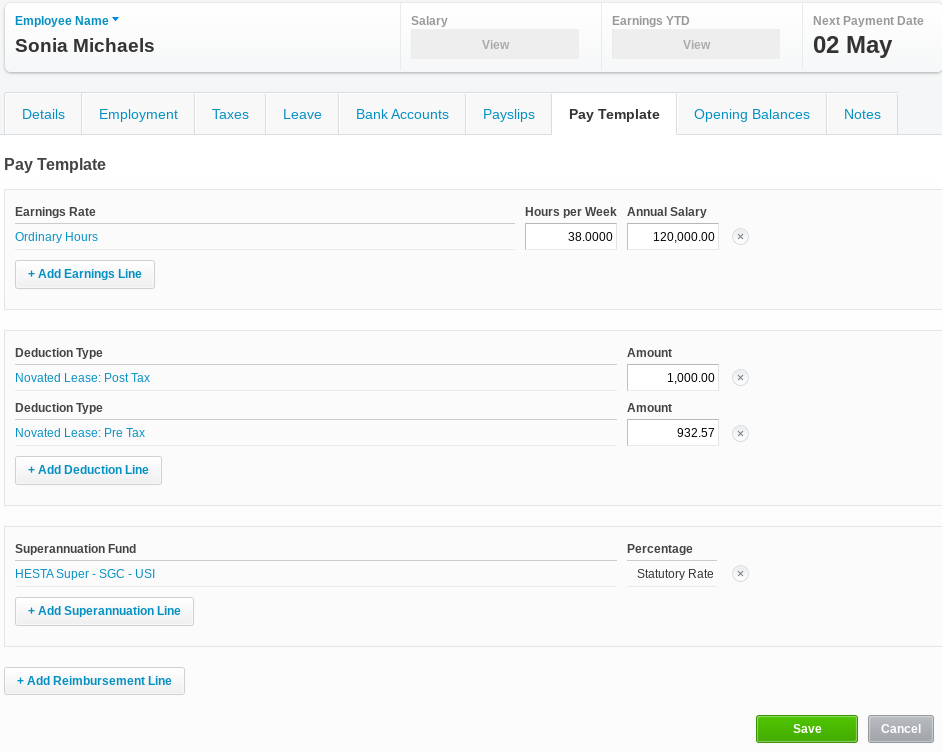
Step 3 – Set up the employee’s pay template & run a pay cycle
Open Sonia’s pay profile in Xero. Add the two deductions as above, then enter the figures provided by the lease provider. See below:
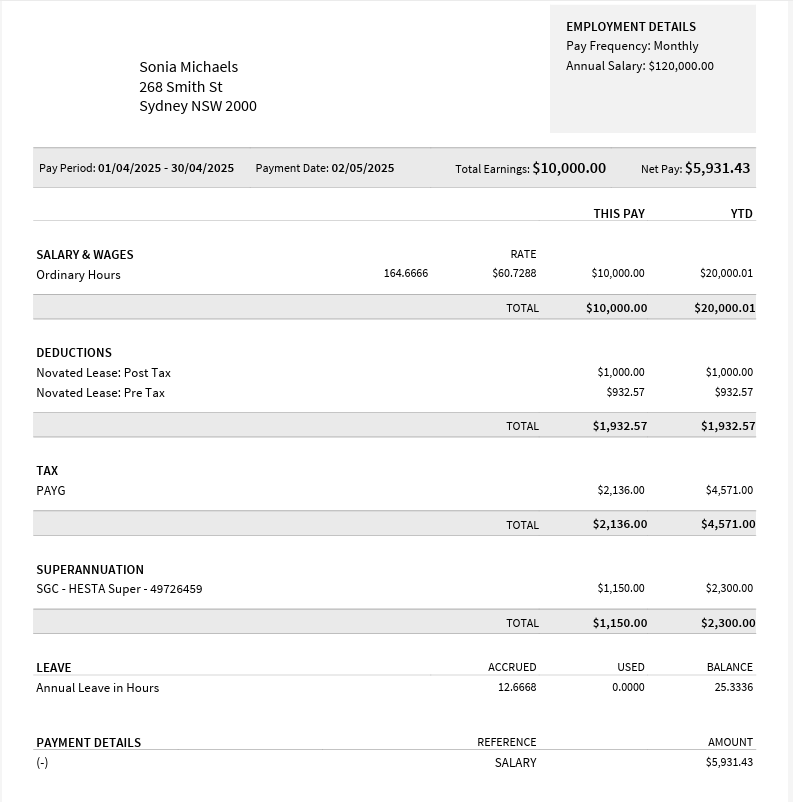
Now process the April pay run in Xero. Sonia’s payslip should look like the below example:
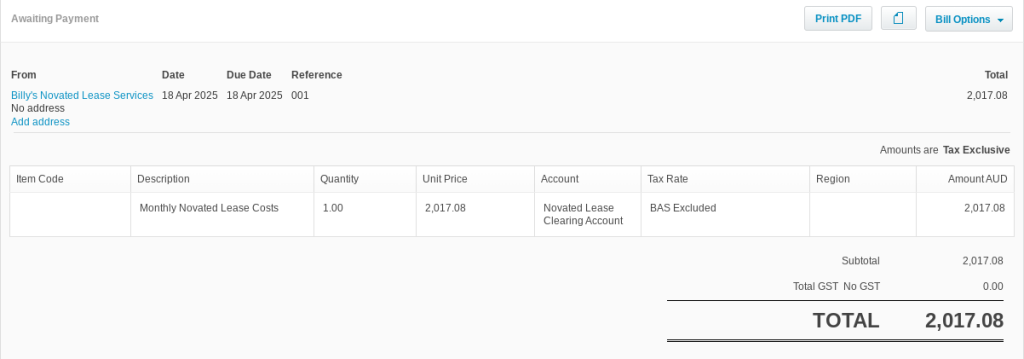
Step 4 – Record the lease provider’s invoice in Xero
In Xero, add the invoice received from the lease provider, “Billy’s Novated Lease Services”. Post the invoice to the Novated Lease Clearing Account with the BAS Excluded tax code. See an example below.
Step 5 – Record GST
There are two GST-related transactions to bring to account:
GST on the novated lease expenses
GST on the post-tax deduction
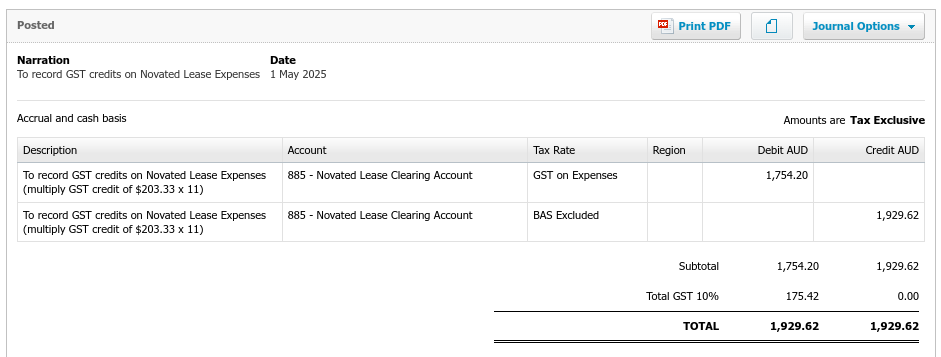
Each month, Billy’s Novated Lease Services will send ABC Industries a report detailing any GST credits available from the novated lease arrangement from the previous month. For ease of explaining this “how to”, we will assume the GST credits align with the example data. The GST credit therefore is $175.42. Now multiply the GST by 11. This will give rise to a figure of $1,929.62. To recognise the GST from the monthly report, enter the following journal:
Here, GST of $175.42 will move to the GST control account and become claimable in the BAS. The clearing account will receive net credit of $175.42.
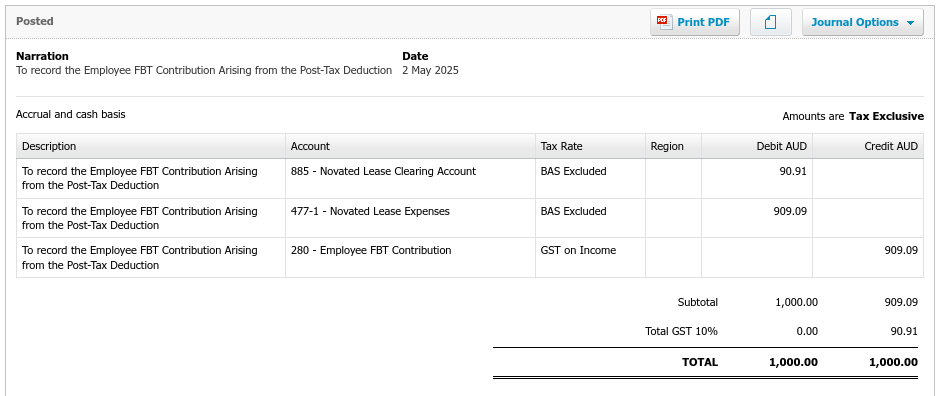
In order to take up the GST from the post-tax novated lease deduction i.e $90.91, enter the following journal:
The consequences of this journal will be:
$90.91 is credited to the GST control account;
The Novated Lease Clearing Account receives a debit of $90.91; and
Novated Lease Expenses receives a debit of $909.09.
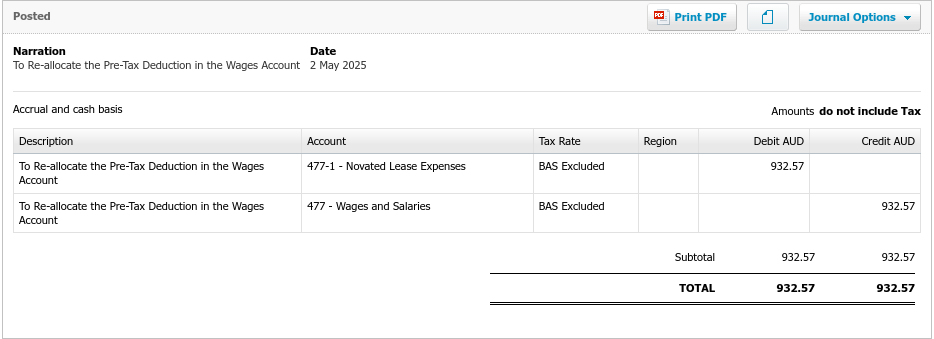
Step 6 – Correct overstated wages
The above payroll event has resulted in overstating the gross wages in the profit and loss. This is corrected by entering the following journal:
Behind the scenes – how are the accounts and the BAS affected by the novated lease?
Now that the above transactions have been processed in Xero, it would be prudent to show you how they affect the accounts and the BAS. Firstly, the novated lease clearing account has been cleared to zero as can be seen below. The account should return to zero each month after the payroll has been processed. If it doesn’t, you will need to investigate to find the cause!
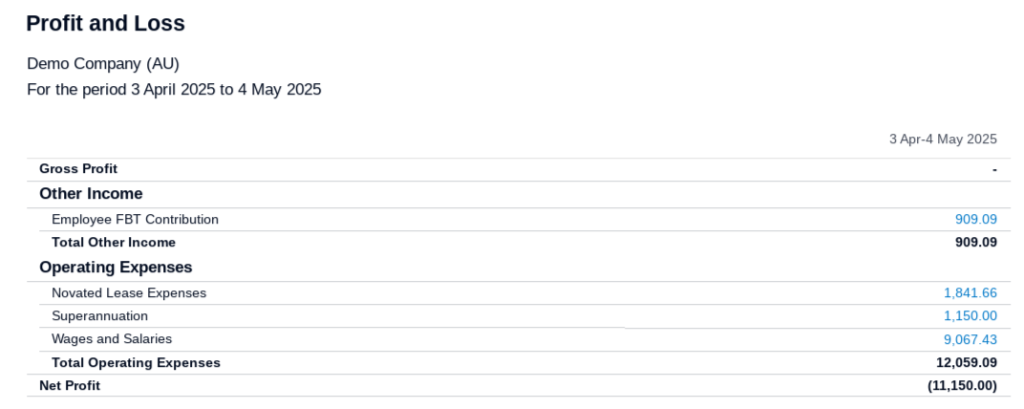
The profit and loss shows the employee FBT contribution as other income and the lease and wage expenses are listed as expected:
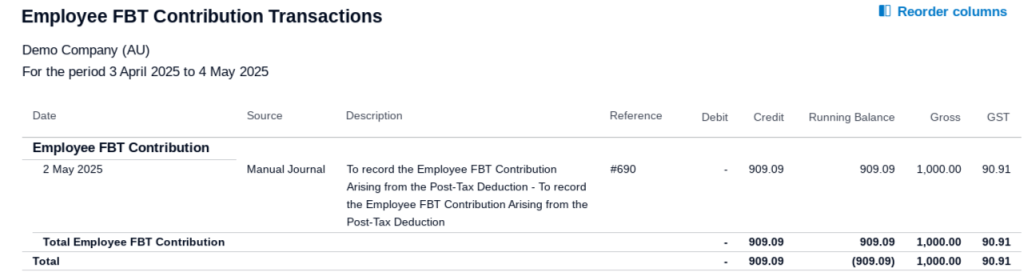
Now let’s drill into each profit and loss account to see the details. Looking at the FBT income I recorded at step 5, we can clearly see the GST posted of $90.91.
Next we can see the details behind the novated lease expenses recorded at step 5 and step 6. The total agrees with the monthly GST exclusive expense amount estimated by the lease provider.
Lastly, looking behind the wages expense transactions, we can clearly see how the wages are reduced by the reallocation of the pre-tax deduction:
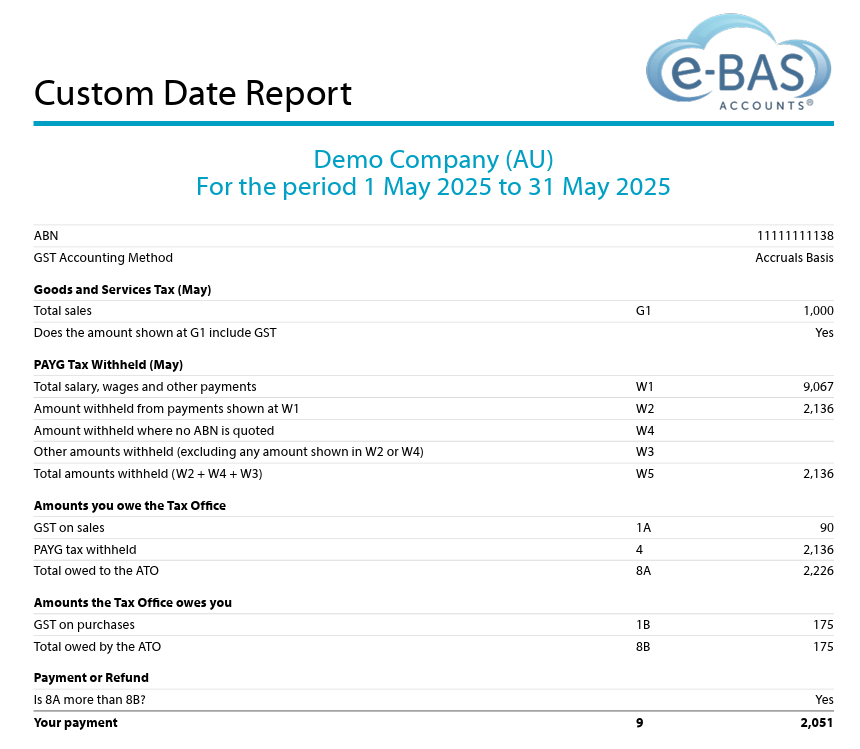
Now we will take a look at the BAS. Note the GST on sales of $90 from the FBT contribution and the GST on Purchases of $175 from the novated lease expenses journal. Also note the reduced gross wages figure which is the correct figure to report to the ATO.
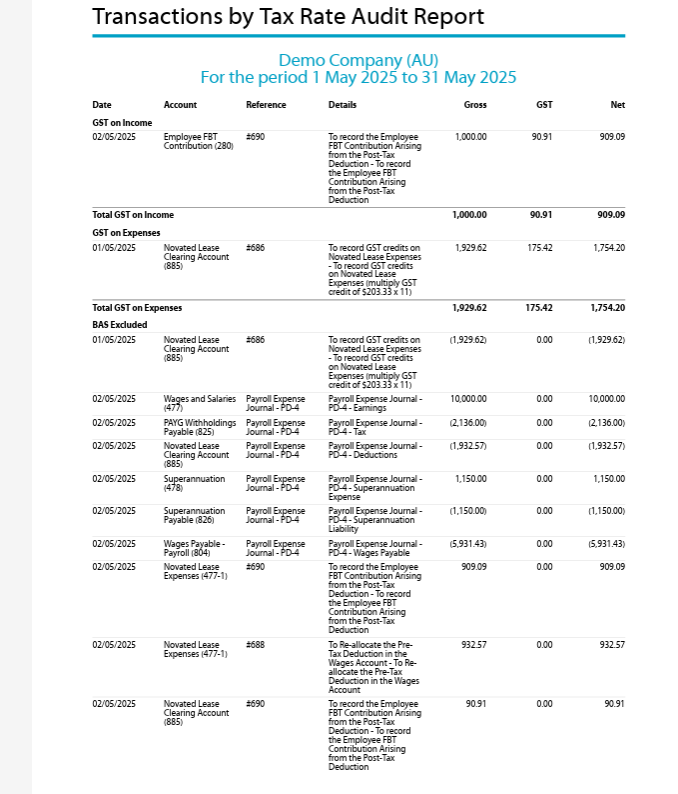
Drilling down into each GST type below, shows us the origin of the figures:
Summary
Setting up a fully serviced novated lease in Xero, as outlined in this guide, offers one approach to managing these arrangements. It’s important to remember that variations in novated lease structures exist, each with its own implications for employee wages and payroll processing. While the data you receive from your lease provider might differ from the steps detailed here, this ‘how-to’ should provide a solid foundation for establishing the necessary accounts and configuring tax deductions within Xero. Please note that I cannot offer guidance on your specific lease agreement, however, I’m happy to address any questions you have about the instructions provided in this blog. Finally, the example figures used in this guide are purely illustrative and should not be evaluated for their financial accuracy or feasibility. The primary goal here is to demonstrate the mechanics of setting up a novated lease within Xero, so please focus on the procedural steps rather than the example’s specific details.
New Criminal Underpayment Laws began on 1 January 2025. It is now an offence to underpay your staff. If found guilty, you may face hefty fines or jail time, or both. Read on to find out what these laws mean and how you can avoid a conviction going forward.
What are these laws?
Employers found to be intentionally underpaying staff by Fair Work, will be investigated. If a case can be raised, it will be referred for criminal prosecution. If an employer is convicted, he/she may face prison time and/or fines (see below).
Employers who have made an honest mistake and did not intend to underpay staff, will not be prosecuted.
How to protect yourself
Fair Work has created the Voluntary Small Business Wage Compliance Code. This Code can be used to check if you are paying your staff correctly. Employers who have complied with the Code in relation to an underpayment, cannot be referred for possible criminal prosecution by Fair Work. Therefore, if you suspect that you may have underpaid staff, it is in your best interests to review the above Code ASAP!
Another way to protect yourself is to write an Cooperation Agreement. This is an agreement between Fair Work and an employer that outlines a possible underpayment event. While the agreement is in force, Fair Work cannot refer the matter for possible criminal prosecution, however, civil enforcement may apply regardless.
Which fines and prison time can apply?
For a company
If the court can determine the amount of the employer’s underpayment, the maximum fine will be the higher of:
3 times the amount of the underpayment
$8.25 million.
If the court can’t determine the amount of the underpayment, the maximum fine is $8.25 million.
For an individual
The court can impose a maximum of 10 years in prison or a fine, or both.
If the court can determine the amount of the employer’s underpayment, the maximum fine will be the higher of:
3 times the amount of the underpayment
$1.65 million.
If the court can’t determine the underpayment, the maximum fine is $1.65 million.
How to avoid all of the above
Simple really! Good employers do two things:
1. Stay up to date with payroll obligations including changes to awards, legislation and employees’ circumstances such as their roles, duties, classifications, relevant qualifications, age, hours of work or location of work.
2. Reach out to reliable sources for help when difficult payroll situations arise. These may include bookkeepers, tax agents, payroll HR associations, payroll processing services, industrial associations and Fair Work.
If you are reading this and are concerned about your situation, now might be the time to reach out to your tax professional and ask for assistance. Fair Work mean business!!
Late edit:
Fair Work have released their long awaited Payroll Remediation Guide. You can download it here. This Guide is directed more to larger employers, where a large number of underpayments or number of impacted employees are identified, or where the issues detected are complex and involve multiple industrial instruments.
Payday Super is coming! Payday Super aims to stop employers from not paying employees super or paying it late. The premise is that super will need to be paid after each pay run, even termination pay runs. Payday Super is set to begin from 1 July 2026.
Two proposed models for Payday Super implementation are:
“Employment payment” model: Employers must pay SG contributions on the same day as wages.
“Due date” model: SG contributions must reach the superannuation fund within a specified time after payday.
Both depend on the definition of “payday,” which includes any payment with an ordinary time earnings component, even outside the regular pay cycle like termination payments or bonuses. SG contributions would be calculated based on the ordinary time earnings paid on payday.
Payday Super will have specific impacts on the Super Guarantee Charge process and the maximum contribution base calculations. The government will consult with key stakeholders and the public to ensure these impacts are minimal.
The Government will finalise the Payday Super framework in the 2024–25 Budget. Legislation will be introduced for the measure set to begin on 1 July 2026. The ATO is consulting and co-designing with digital service providers for implementation.
In the meantime, employers must consider how Payday Super will affect their payroll processes and cash flow. It is also important to note that by July 2026, the super rate will be 12% which will also impact business cash flow. There are lots of issues to consider here and I will keep you updated as more information about Payday Super comes to hand.
Note: The government has released draft legislation to mandate payday super, a policy that was first flagged in the 2023-24 Federal Budget.
The ATO has decided that small businesses with a history of non-payment, late or non-lodgement or incorrect reporting, will be moved from quarterly to monthly GST reporting i.e. a monthly BAS.
The ATO will begin this process from 1 April 2025 and will start with around 3,500 small businesses (and no, this is not an April’s Fool joke!). Those businesses affected will need to remain on the monthly cycle for a minimum of 12 months.
The ATO believes that this new protocol will help small businesses to comply with their tax obligations because they will need to be more organised in terms of bookkeeping to lodge a monthly BAS. The ATO also thinks that this will assist cash flow given business owners will need to pay smaller amounts more regularly.
If small business owners continue to ignore their tax debts and compliance obligations, it is not a question of “if” but “when” they will hear from the ATO. From the ATO Deputy Commissioner, Will Day:
‘We take our role seriously and are committed to supporting viable small businesses to comply with their ATO obligations, while also taking firmer action on those who are deliberately not complying to ensure they aren’t getting an unfair advantage. If you’re a small business who continues to deliberately disregard your obligations, you can expect the ATO to move you to more frequent GST reporting’.
The ATO will contact small business owners and their tax professionals if BAS reporting needs to move to a monthly cycle. There will be a review process in place for those small business owners who believe they do not have a history of non-compliance.
If you own a small business and are non-compliant, expect to move to monthly BAS lodgements soon. Contact your tax professional or the ATO ASAP to discuss, as the impact on your business finances and processes will be significant!
My Thoughts
I fully support the ATO’s efforts to recover long-standing tax debts and understand that non-compliance gives some an unfair advantage over those who follow the rules. However, this protocol might worsen the situation for some small business owners. Here are some issues I believe may arise from this ATO campaign:
Monthly BAS lodgers must lodge and pay by the 21st of each month, losing the extension given to quarterly online lodgers, who get an extra month. While this could encourage better organisation in bookkeeping and cash flow, it might also lead to more disorganisation and increased tax debt for some. A better idea perhaps, would be to allow business owners to remain on a quarterly cycle but disallow the lodgement extension. That way, they are still forced to be more organised and pay more regularly, but without the onerous task of doing so monthly.
Those business owners on a current ATO payment arrangement may need to re-negotiate if they are expected to pay a monthly BAS on top of other tax debt. This is because all current and future BAS must be paid on time in order to retain the payment arrangement. This may be quite difficult for some, but I guess this is what the ATO are trying to achieve – pulling in tax revenue more regularly and on time.
Businesses using tax professionals will face higher costs, paying for 12 BAS lodgements per year instead of 4. This increase in bookkeeping/accounting fees will add further financial stress. Some business owners might choose to handle it themselves to save money. While this works for those familiar with accounting, it could result in messy accounts and BAS reporting errors for others.
As a bookkeeper/BAS Agent, I’ve noticed that non-compliant clients are often not great business owners. They are disorganised and need constant reminders, which is already challenging on a quarterly cycle. Doing this monthly would be even more frustrating, likely leading to strained relationships and parting ways with clients.
I hope the ATO has considered these implications. While monthly reporting might help some, it could increase financial stress and non-compliance for others.
I do believe some business owners shouldn’t be in business, especially those who think they’re above the law. In my opinion, they should be closed down and made to repay their debts over time. This ATO measure might help, but perhaps more decisive action, like forced business closure (or the threat thereof), is needed.
You may have heard that Payday Super is coming in July 2026. In short, Payday Super will require all employers to pay their employees’ super on the same day as a pay run is processed. The main reason behind this measure is that the Government wishes to end non-payment and underpayment of super by some employers as this is effectively wage theft. The measure will also mean that millions of employees will receive higher retirement savings due to their super contributions being paid earlier and more frequently.
What you may not know is that from 1 July 2026, the ATO Small Business Super Clearing House (SBSCH) will close. Yes, you heard right—it is closing its doors at the same time as Payday Super begins.
So, what can you do to prepare if you are a current SBSCH user? Your options are limited. You can either move to your default super fund’s clearing house or use the super functionality in your payroll software, such as Xero, MYOB, or QBO. I recommend not waiting until the SBSCH closes to get this organised. Make the change as soon as practicable.
How did I hear about the SBSCH closing? I read the fact sheet from the Government Treasury website. You can access the fact sheet here if you wish to read the details behind Payday Super.
The fact sheet breaks down many other details about Payday Super and is an important read if you are an employer. I suggest you take the time to review it and figure out how you will apply this change to your payroll processes when the time comes.
Good news has arrived for those planning a family in the next year or so. The government has decided to pay super guarantee equivalent payments on government-funded Paid Parental Leave (PPL). This will begin from 1st July 2025 i.e. for any babies born or adopted on or post this date. This measure is now law.
While Services Australia will continue to facilitate the PPL process, the ATO will be responsible for paying the super component (not employers). The ATO will pay the super in a lump sum at the start of the following financial year at the then super rate of 12% plus any interest owing. The first payments will be processed in July 2026.
This is a step forward in ensuring that those who choose to be stay-at-home parents are not disadvantaged in terms of future retirement savings. This is a good thing! A fairer system for all!
If a super payment has failed, the payment authoriser will receive an email notification, outlining the reason for the failure. The status of the payment will change from “pending processing” to “failed”. When this happens, the payment can be reprocessed as the batch will become available for selection in the “Add Super Payment” screen again. Details of the steps required to reprocess failed payments can be found in the above link.
Returned Auto Super Payments
As for failed payments, the authoriser will receive an email if a super payment is returned with information about which employees are affected. Xero can’t tell you why the payment was returned so you will have to contact the super fund affected to obtain those details.
In Xero, the payment status will change to either “partially returned” or “returned”, depending on how many employees are affected.
To find out how to reprocess returned auto super payments, go to the link above.
My Thoughts?
I think this update is an improvement overall, however, the following details from the above link about the timing of the status change to “failed”, have me a bit concerned:
‘This can take up to five business days, with further delays during peak processing times, such as at the end of a quarter. While waiting for the failure message, you can’t update the status of the batch manually.’
Given that the ATO states that “contributions are considered ‘paid’ when they are received by the super fund not when they are paid to the commercial clearing house”, the delays as described by Xero could trigger a Super Guarantee Charge requirement depending on the payment dates involved. This will adversely affect the employer and his/her cash flow, given the SGC increases the super liability overall. This seems a little unfair especially if the employer did pay the SG in a timely manner (or thought he/she did!).
I guess, the only remedy here is to ensure that SG is paid as early in the month as possible so that if any payments are returned or fail, they can be rectified well before the super payment cut-off dates. This issue will become null and void of course, when Payday Super begins (I hope!).
On Monday 26th August 2024, changes to casual employment laws came into effect.
The changes include a new definition of a casual employee and a new pathway for employees to convert from casual to permanent employment.
Please note employees who are casual before the 26th of August, will remain casual under the current definition unless they choose to transition to full-time or part-time (permanent) employment.
New Casual Definition
A person will be a casual employee if:
there isn’t a firm promise of ongoing work and
he/she is entitled to a casual loading or casual pay rate under an award, registered agreement or employment contract.
Employees who begin as casuals will remain as casuals until their employment status changes either through a conversion process or by accepting alternative employment under a different status.
Casual Conversion – Employee Choice Pathway
There will be a new pathway for eligible employees to change to full or part-time employment. This will replace the current rules for changing to permanent employment and will be known as the “Employee Choice Pathway”.
Under the new rules, eligible casual employees can notify their employers in writing of their intention to change to permanent employment. Employers can only refuse the notice for certain reasons (see below).
Casual employees can apply to move to permanent employment if:
they have been employed for at least 6 months (12 months if a small business) and
they believe they are no longer casual employees.
Employers must discuss this potential change to employment with the casual employee before committing to any change. The details of the changes must be worked through via this discussion. Then, employers must respond in writing within 21 days either accepting the change or not accepting it.
There are only a few reasons why a request to move to permanent employment can be rejected. These include:
the employee still meets the definition of a casual employee
there are fair and reasonable operational grounds that would negatively impact the business. Read more here about this here.
the employer is bound by a recruitment or selection process required by law and accepting the request would mean he/she is no longer compliant.
The current casual conversion rules will continue to apply to employers and casuals employed before 26th August 2024 for a transitional period. See those details here.
Reminder! Casual Employment Information Statement
There is a new statement to hand to all casual employees when they begin work. It must also be provided after 12 months of employment (small business employers) and for other employers, after 6 and 12 months, and then after every 12 months of employment. Download the statement here.
For further details about the changes to casual employment rules, go to the Fair Work website.
The ATO has set up a website to help small business owners learn about running their businesses. It’s called Essentials to Strengthen your Small Business. The site covers the 5 stages of business life (from idea to exit) and offers 21 short courses across each stage. In this blog, I’ll walk you through this website so you can see if it’s right for you!
On the website, you’ll find courses linked to one of the 5 stages of your business: Idea, Start-up, Day to Day, Change, and Exit.
Idea: when you’re thinking about starting a business.
Start-up: when you’ve just begun and need guidance on what to do next.
Day to Day: when your business is running, and you want help with everyday management.
Change: when you plan to reshape or update your business.
Exit: when you’re retiring, selling, or closing down your business.
21 Courses
The 21 courses match the stage your business is in. They cover topics from starting a business to keeping records, closing down—and everything in between. For instance, clicking “Start-up” shows you 11 courses on GST, cash flow, record keeping, home-based business deductions, and more. You can filter by business structure and industry to find the most relevant courses.
Course Breakdown
Each course has an overview, a video, and modules you can do in any order. If some modules don’t apply to you, skip them. Every course has “fast facts” – key points from the lessons. There are also “quick links” for more info. After each course, take a knowledge check to see what you need to review. Plus, there’s an “action plan” – a checklist to guide your next steps based on your learning. You can download the fast facts and action plan as PDFs or Word Docs to share or keep.
Course Account
Create an account on the website to track your courses. With an account, you can create a learning path that fits you and your business. Add or remove courses anytime from the course list. You can also save notes and favourite pages to visit later from your dashboard.
Here’s the video from the website that shows you how everything works, for those who like watching instead of reading!
This learning hub is perfect for small business owners looking for guidance without spending much time or money. It’s one of the best ATO initiatives I’ve seen recently.
For those who use the Cash Flow Coaching Kit, please note that it will be moved to this new Essentials website on June 30 2024.