How To

Fully Serviced Novated Leases – How to Set up in Xero
In this blog I will show you how to set up a fully serviced novated lease for a motor vehicle in Xero. Before I begin, I would like to make it clear that every novated lease arrangement is different, depending on the agreement made between the employee and the lease provider. If this “how to” does not seem to match up with your requirements, please seek further advice from your tax agent or the lease provider. I will not be providing advice to readers about their individual requirements for their novated lease set ups, so please don’t ask! Again, seek advice from your tax professional or the lease provider company if you need help.

What is a Novated Lease?

Before diving into the “how-to” of this blog, it’s important to understand what a novated lease is. A Novated lease itself is a type of vehicle financing arrangement involving an employee, their employer and a leasing provider. Essentially, an employee is able to purchase a vehicle AND receive tax concessions under a salary sacrifice arrangement, orchestrated through payroll. Simply put, “to novate” means “to move with,” and in the context of a novated lease, it signifies that the employee’s vehicle and lease agreement can move with them if they change employers.

How a Novated Lease Works

Basically, a novated lease occurs as per the below steps:

  1. An employee chooses a vehicle to buy.
  2. A Leasing Provider provides a lease agreement to the employee which sees the employer take over the rights and obligations under the lease via a “deed of novation”. It should be noted that the deed of novation includes a clause that transfers the lease obligations back to the employee on termination of the lease or when the employee ceases employment with the employer.
  3. The employee and employer enter into a salary sacrifice agreement whereby deductions are taken from the employee’s pay to fund the lease.
  4. The employer pays the leasing provider with the payroll deduction funds. This means the employer is not out of pocket, both from a cash flow and tax perspective.

What is a Fully Serviced Novated Lease?

In this scenario, another party is introduced – a salary packaging provider. This provider will send the employer a reconciliation report the compares the actual motor vehicle costs against the novated lease estimated costs. If there is any variance, an adjustment must be made to the employee’s pre-tax deduction and sometimes, an adjustment is also required to the post-tax deduction.

A fully serviced novated lease includes, not only the lease repayments, but also other vehicle expenses such as:

  • Insurance
  • Maintenance like servicing, repairs and parts
  • Registration
  • Fuel
  • Roadside Assistance
  • Tolls
  • Car washing

This type of novated lease operates in the same way as described above, however it has an extra component which is FBT. The post-tax deduction is known as an Employee FBT Contribution which attracts GST. The employer also claims the GST on the novated lease expenses. The pre-tax deduction is calculated as the novated lease expenses minus the post-tax deduction (GST exclusive).

How to Set up the Fully Serviced Novated Lease in Xero

This “how to” will be based on the following novated lease example:

Sonia works for ABC Industries and is paid $120,000 plus super per annum on a monthly pay cycle. She decides to purchase a vehicle costing $60,000 and asks her employer if she can salary sacrifice the purchase via a fully serviced novated lease. Sonia’s employer agrees with the request and asks Billy’s Novated Lease Services to assist with the facilitation of the lease. Once the lease is in place, Billy’s Novated Lease Services provides the following information to ABC Industries:

The novated lease will be for 5 years and based on the following estimated costs, the fixed monthly amount will be $2,017.08. See the details below:

ITEMGST ExclusiveGSTTOTAL
Lease Payment14,0001,40015,400
Fuel3,0003003,300
Servicing & Repairs2,0002002,200
Registration9000900
Insurance1000851085
Roadside Assistance50050550
Tolls40040440
Car Wash and Vacuum30030330
Total Estimated Annual Costs22,1002,10524,205
Monthly Novated Lease Amount1,841.66175.422,017.08

The fringe benefit figure and related pre and post tax figures are also provided to ABC Industries as below:

Vehicle Cost$60,000
Fringe Benefit Taxable Value$12,000
Monthly Employee FBT Contribution Required$1,000

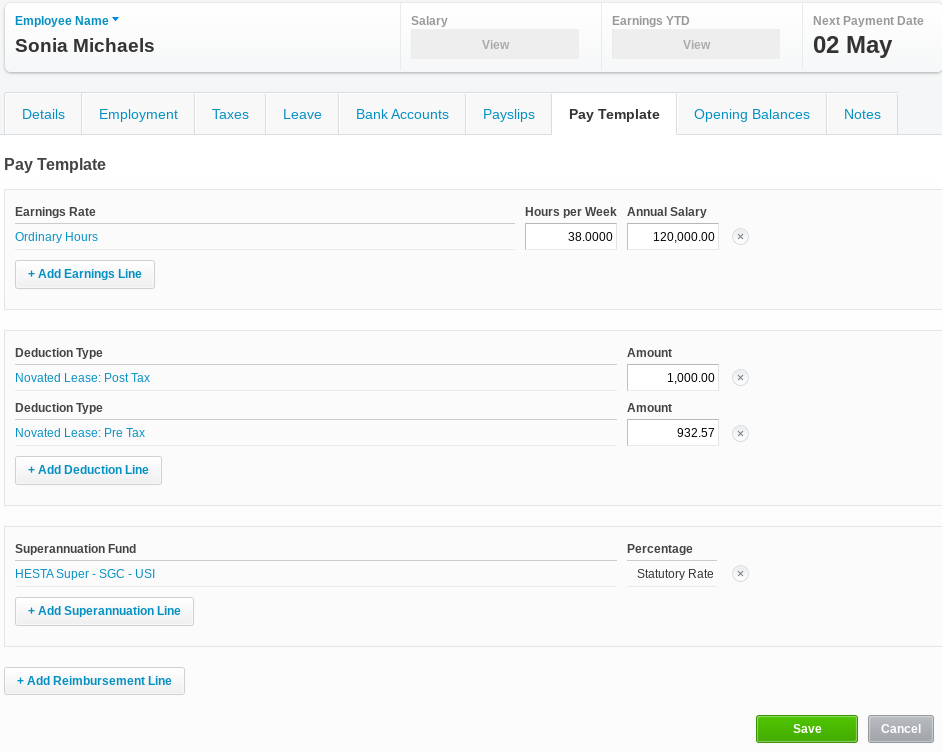
Post-tax deduction = Employee FBT Contribution = $1,000.00
Pre-tax deduction = GST-exclusive Novated Lease Expenses minus GST-exclusive post-tax contribution
= ($2,017.08 – $175.42) – ($1,000.00 x 10/11)
= $1841.66 – $909.09
= $932.57

The following steps will need to be actioned in order to set up the above lease in Xero:

Step 1 – Add the following accounts to the Chart of Accounts

  • Novated Lease Clearing Accountliability account, current liability; – BAS Excluded tax code; set up a separate account for each affected employee.
  • Novated Lease Expensesexpense account – BAS Excluded tax code; put under payroll costs like wages or super etc.
  • Employee FBT Contributionsrevenue account – GST on Income tax code; place under non-trading income type e.g. “Other Income”
  • Fringe Benefits Tax – needed if an FBT liability arises; expense account – BAS Excluded tax code; place under general overheads.

Step 2 – Set up the payroll tax deductions

  • Pre-Tax Novated Lease Deduction – reduces PAYG WH; may or may not reduce SG (but shouldn’t); excluded from W1; STP – Salary Sacrifice – Other Employee Benefits (type O); direct this deduction to the Novated Lease Clearing Account.
  • Post-Tax Novated Lease Deduction – Does not reduce PAYG WH; Does not reduce SG; Is not excluded from W1; STP – not reportable; direct this deduction to the Novated Lease Clearing Account.
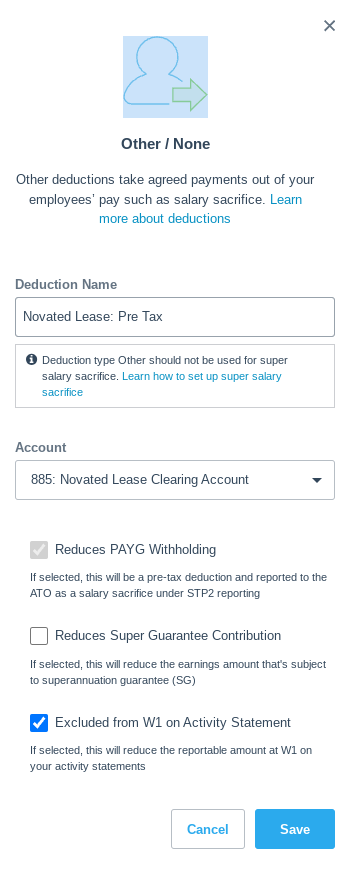
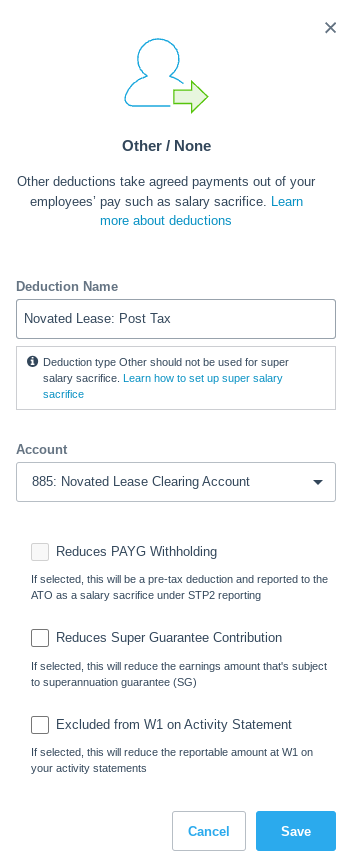
Step 3 – Set up the employee’s pay template & run a pay cycle

Open Sonia’s pay profile in Xero. Add the two deductions as above, then enter the figures provided by the lease provider. See below:
Now process the April pay run in Xero. Sonia’s payslip should look like the below example:
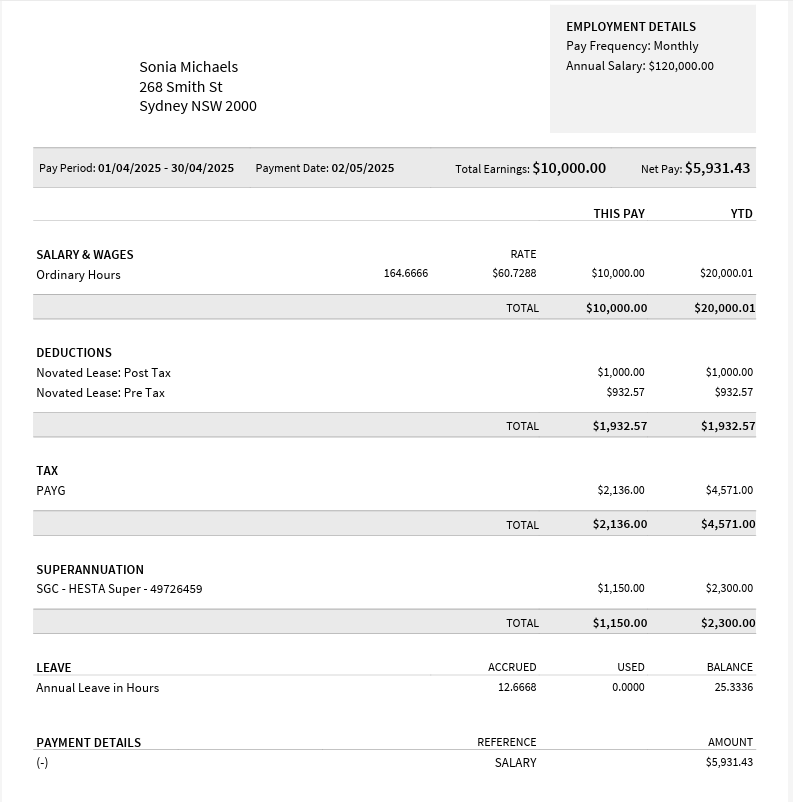
Step 4 – Record the lease provider’s invoice in Xero

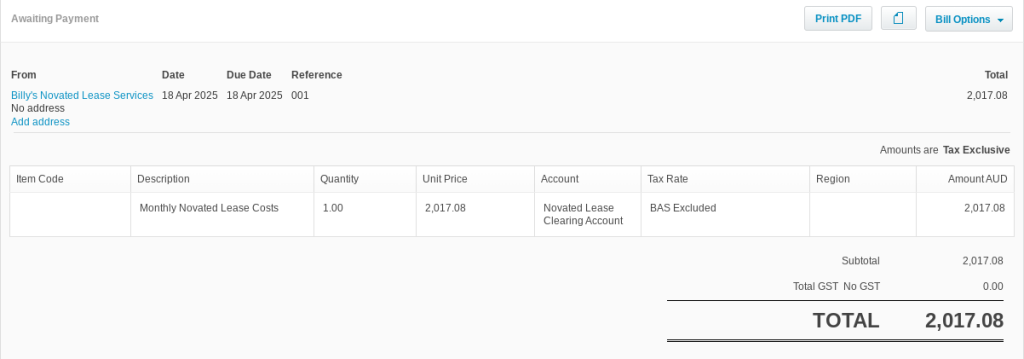
In Xero, add the invoice received from the lease provider, “Billy’s Novated Lease Services”. Post the invoice to the Novated Lease Clearing Account with the BAS Excluded tax code. See an example below.
Step 5 – Record GST

There are two GST-related transactions to bring to account:

  1. GST on the novated lease expenses
  2. GST on the post-tax deduction

Each month, Billy’s Novated Lease Services will send ABC Industries a report detailing any GST credits available from the novated lease arrangement from the previous month. For ease of explaining this “how to”, we will assume the GST credits align with the example data. The GST credit therefore is $175.42. Now multiply the GST by 11. This will give rise to a figure of $1,929.62. To recognise the GST from the monthly report, enter the following journal:
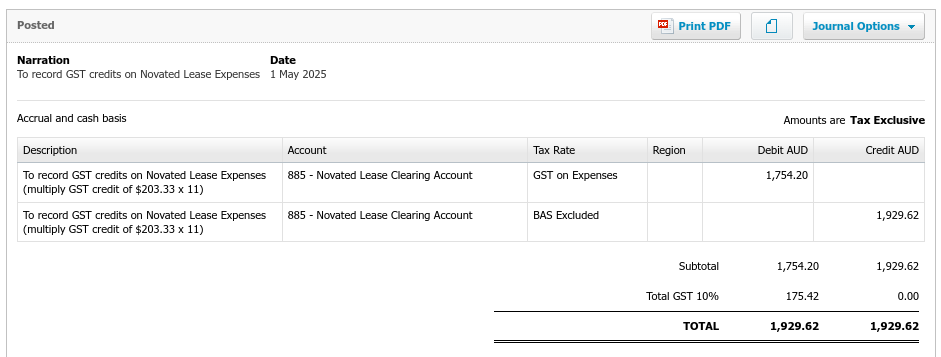
Here, GST of $175.42 will move to the GST control account and become claimable in the BAS. The clearing account will receive net credit of $175.42.

In order to take up the GST from the post-tax novated lease deduction i.e $90.91, enter the following journal:
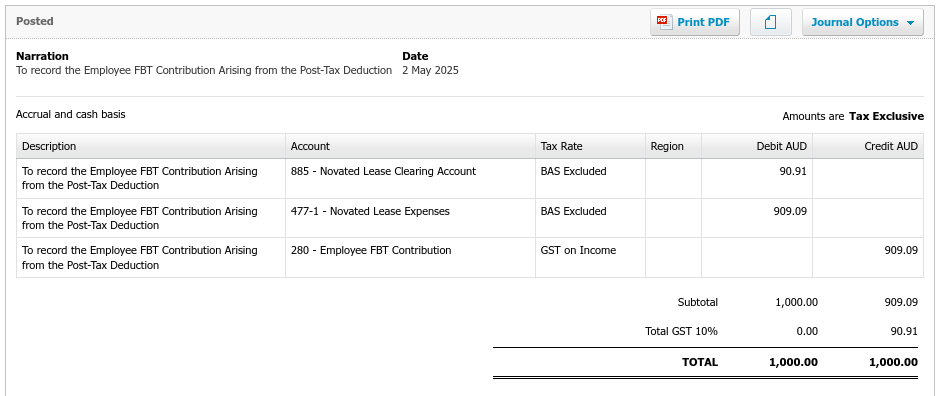
The consequences of this journal will be:

  • $90.91 is credited to the GST control account;
  • The Novated Lease Clearing Account receives a debit of $90.91; and
  • Novated Lease Expenses receives a debit of $909.09.

Step 6 – Correct overstated wages

The above payroll event has resulted in overstating the gross wages in the profit and loss. This is corrected by entering the following journal:
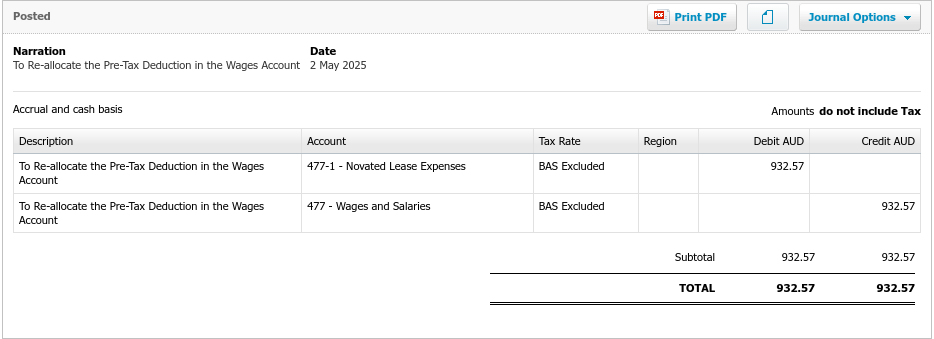
Behind the scenes – how are the accounts and the BAS affected by the novated lease?

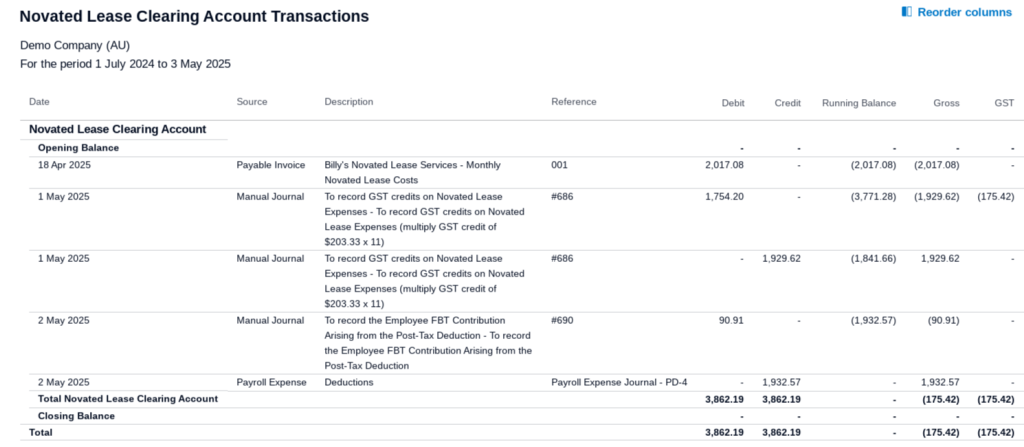
Now that the above transactions have been processed in Xero, it would be prudent to show you how they affect the accounts and the BAS. Firstly, the novated lease clearing account has been cleared to zero as can be seen below. The account should return to zero each month after the payroll has been processed. If it doesn’t, you will need to investigate to find the cause!
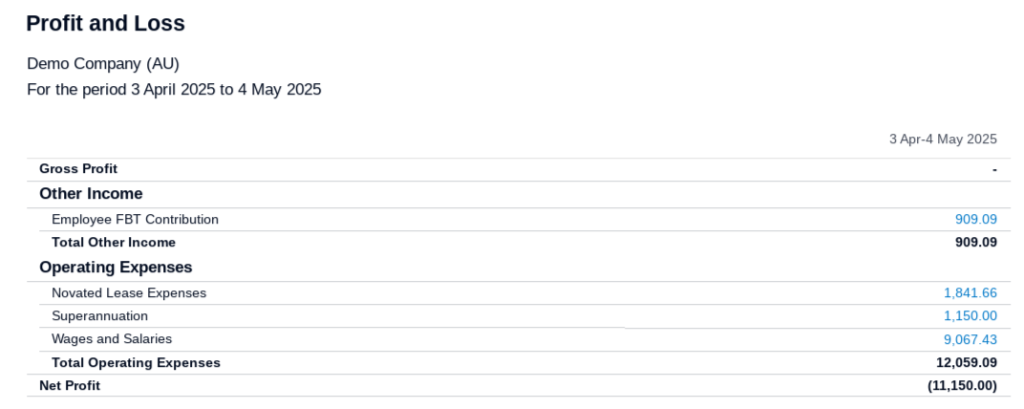
The profit and loss shows the employee FBT contribution as other income and the lease and wage expenses are listed as expected:
Now let’s drill into each profit and loss account to see the details. Looking at the FBT income I recorded at step 5, we can clearly see the GST posted of $90.91.

Next we can see the details behind the novated lease expenses recorded at step 5 and step 6. The total agrees with the monthly GST exclusive expense amount estimated by the lease provider.

Lastly, looking behind the wages expense transactions, we can clearly see how the wages are reduced by the reallocation of the pre-tax deduction:

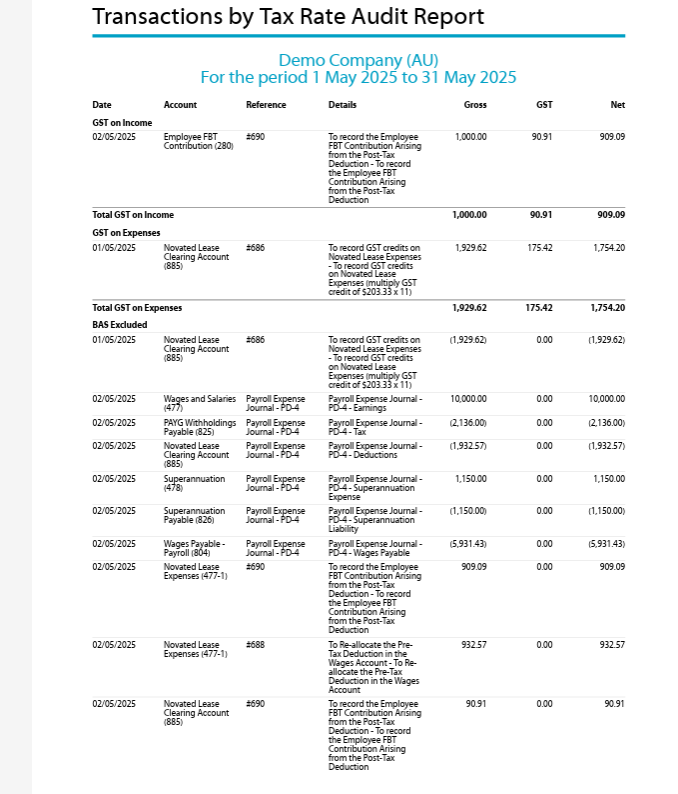
Now we will take a look at the BAS. Note the GST on sales of $90 from the FBT contribution and the GST on Purchases of $175 from the novated lease expenses journal. Also note the reduced gross wages figure which is the correct figure to report to the ATO.
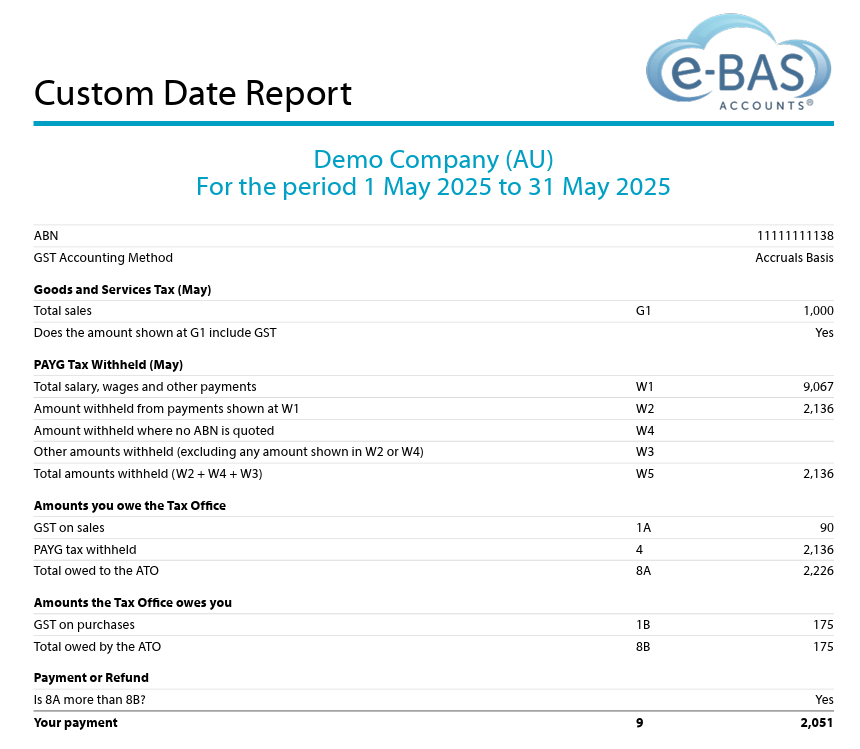
Drilling down into each GST type below, shows us the origin of the figures:
Summary

Setting up a fully serviced novated lease in Xero, as outlined in this guide, offers one approach to managing these arrangements. It’s important to remember that variations in novated lease structures exist, each with its own implications for employee wages and payroll processing. While the data you receive from your lease provider might differ from the steps detailed here, this ‘how-to’ should provide a solid foundation for establishing the necessary accounts and configuring tax deductions within Xero. Please note that I cannot offer guidance on your specific lease agreement, however, I’m happy to address any questions you have about the instructions provided in this blog. Finally, the example figures used in this guide are purely illustrative and should not be evaluated for their financial accuracy or feasibility. The primary goal here is to demonstrate the mechanics of setting up a novated lease within Xero, so please focus on the procedural steps rather than the example’s specific details.

Like it? Share it!

Fully Serviced Novated Leases – How to Set up in Xero Read More »
Client Agent Linking – Useful Links, Videos & Phone Numbers

In a previous blog, I discussed the challenges agents and clients face because of Client Agent Linking (CAL). Many of the issues encountered are related to setting up various digital identity software and/or not understanding the CAL process. In this blog, I will share useful links, videos and phone numbers to help those stumbling through this difficult task! 

As mentioned, the CAL process is complicated. It involves setting up a myGovID, linking the ABN to the myGovID in Relationship Authorisation Manager (RAM), logging into Online Services for Business (OSB), nominating a new agent and finally advising the agent that the nomination has occurred. The links to assist with setting up myGovID, RAM and OSB are below, along with a step-by-step guide to CAL both in written and video format. Some phone numbers are listed for those who prefer to call a human being! I hope this helps those who are struggling with CAL.

  1. How to nominate an agent in online services for business (download)
  2. The agent nomination process explained
  3. Troubleshooting guide for agents
  4. How to set up myGovID
  5. Online services for businesses
  6. Relationship Authorisation Manager (RAM)
  7. Link your myGovID to your ABN
  8. For agents – think before you link!

CAL – Useful Phone Numbers

  1. ATO – help with nominating an agent or with online services for business – 132866
  2. ATO – help with late lodgements and payments due to not being able to link to an agent – 1300 660 048
  3. ATO – agent can’t link a new client in online services due to a system error – 137286 (only call if the client has completed the nomination process)
  4. RAM – 1300 287 539 (select option 3 for RAM enquiries)
  5. myGovID – 1300 287 539 (select option 2, then option 1 for myGovID enquiries).

CAL – Useful Videos

ATO Client-To-Agent Linking Steps: How to nominate an agent in Online Services for Business

Client / Agent Linking – An ATO How-To Tutorial

Like it? Share it!

Client Agent Linking – Useful Links, Videos & Phone Numbers Read More »

How to Series No 4 – How to Account for Hire Purchases

This is the fourth part in a series I’m calling “How-To”. The first part was about insurance bills, the second part was about VicRoads registration bills and the third part was about chattel mortgages. I will be using Xero for the example, but don’t worry if you use another software, the basic rules will still apply. 

The fourth how-to is about how to account for hire purchases in your accounting software. A hire purchase arrangement is an agreement to purchase goods in instalments.

Step 1

Let’s pretend that your business has purchased a new printer with all the bells and whistles for $15K via a hire purchase agreement, plus $5,000 interest.  For this example, the hire purchase is for 30 months without a residual (balloon) payment at the end of the period. Note, that most hire purchase agreements will include a balloon component (check your documentation). The first thing to do is collect all of the documentation. You will need the hire purchase agreement, the invoice, and the interest amortisation schedule. The hire purchase company will provide all of this to you at the point of purchase. To begin the process, create some accounts in your accounting software:

  • Office Equipment (Asset GST Inc)
  • Hire Purchase Unexpired Interest (Liability GST Inc)
  • Hire Purchase Liability (Liability BAS Excluded)
  • Interest Expense – Hire Purchase (Expense BAS Excluded)

Note, For any Hire Purchase Agreement made after 1/7/2012, both the purchase price of the asset and all interest charges and fees are subject to GST. (see notes at the end of the blog)

Step 2

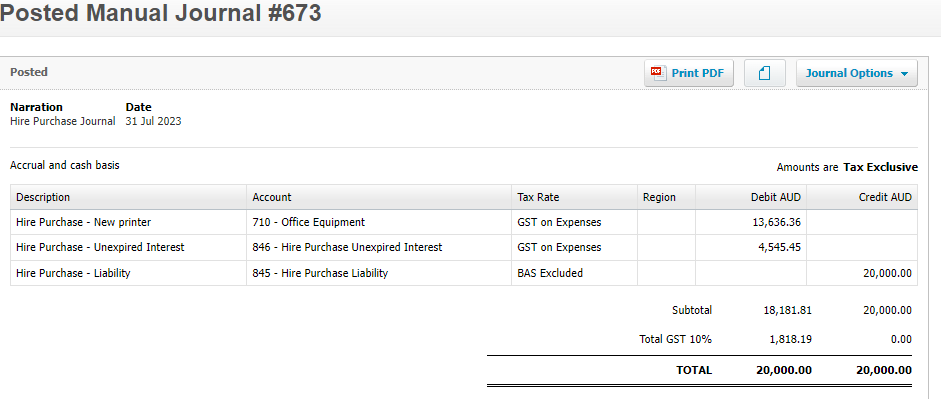
Now you can enter this journal which adds the purchase of the printer into the accounts:

Check your balance sheet. It should look like this:

Step 3

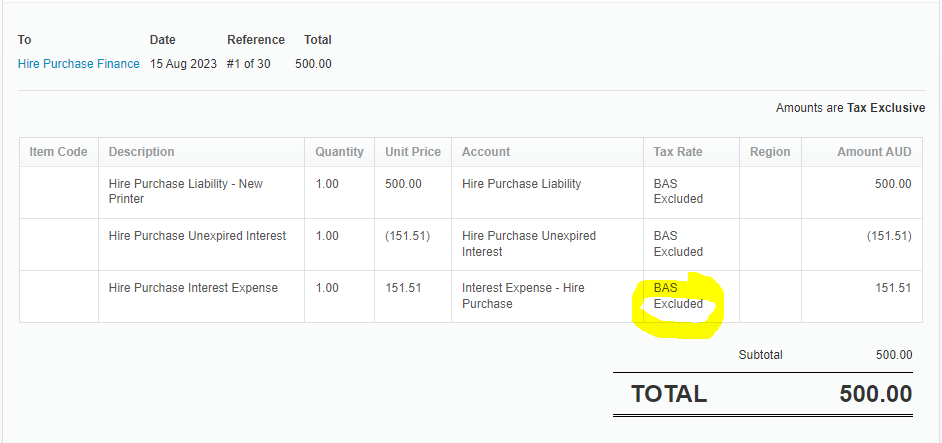
When it comes time to record the first repayment to the finance company, your entry will look like this (assuming each repayment is $500 (30 x $500 = $15K)). Note, that the tax code for the interest expense account is BAS Excluded. This is because the GST on the interest component of the hire purchase was claimed when the purchase was entered initially (see journal). Therefore the monthly repayments of interest are not reportable on the BAS.

Step 4

Check that the balances in the balance sheet are reduced by the first repayment – see below. Note that I have evenly split the interest repayments into amounts of $151.51 for this example ($4,545.45 divided by 30 payments). However, you will need to enter the interest amounts as per your amortisation schedule and these won’t be exactly the figures divisible by the number of repayments. Something to keep in mind!

GST rules for hire purchases

For hire purchase agreements entered into on or after 1 July 2012, all components of the transaction are subject to GST including:
• The upfront purchase price of the asset financed under the agreement
• Interest charges, and
• Any other associated fees.

This is the case regardless of whether you account on a cash or accrual basis.

This means that taxpayers on a cash accounting basis can claim the full amount of any available GST credit at the time the first payment is invoiced or paid under the hire purchase.

This was the last part of our How-To series (for now). I hope you found this series useful. For further details about hire purchase agreements and GST, go to this ATO webpage.

Like it? Share it!

How to Series No 4 – How to Account for Hire Purchases Read More »

How to Series No 3 – How to Enter a Chattel Mortgage Asset Purchase & Loan

This is the third part in a series I’m calling “How-To”. The first part was about entering insurance bills and the second part was about how to enter a VicRoads registration bill. I will be using Xero to present the example, but don’t worry if you use another software, the basic rules will still apply. 

The third how-to is about how to enter a Chattel Mortgage asset and associated loan into your accounting software.

Step 1

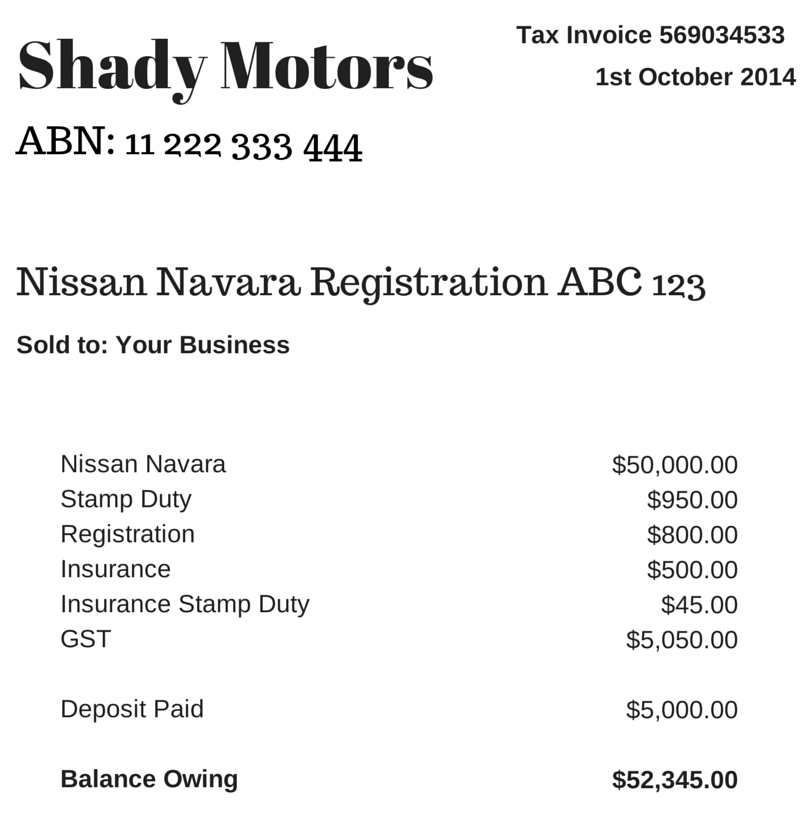
Let’s say your business has purchased a new motor vehicle. The invoice from the vehicle dealer might look something like the below example. Grab your invoice now.

Step 2

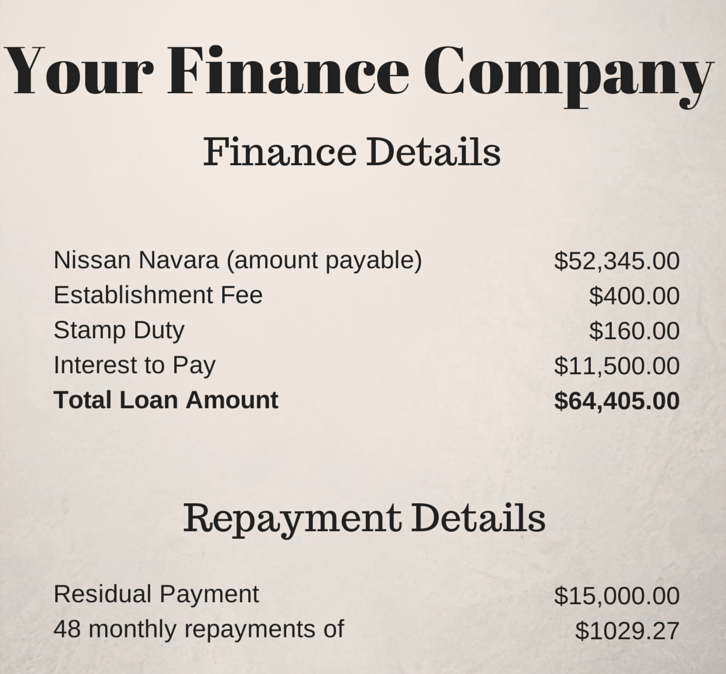
The finance company loan schedule is also required. It may look something like the below example. Grab you loan schedule now.

Step 3

Create the following accounts in your software (check first because some may already exist):

  • Deposit Paid (Current Asset) – no tax code
  • Motor Vehicles at Cost (Non-Current Asset) – apply capital expense including GST tax code
  • Chattel Mortgage (Motor Vehicle) (Non-Current Liability) – no tax code
  • Chattel Mortgage Interest Charges (Expense) – no tax code
  • Chattel Mortgage Fees & Charges – tax code varies, could be Free or GST inclusive (check your documentation)
  • Motor Vehicle Registration (Expense) – apply GST Free tax code
  • Motor Vehicle Insurance (Expense) – apply GST inclusive tax code
  • Unexpired Term Interest (Non-Current Liability) – no tax code

Step 4

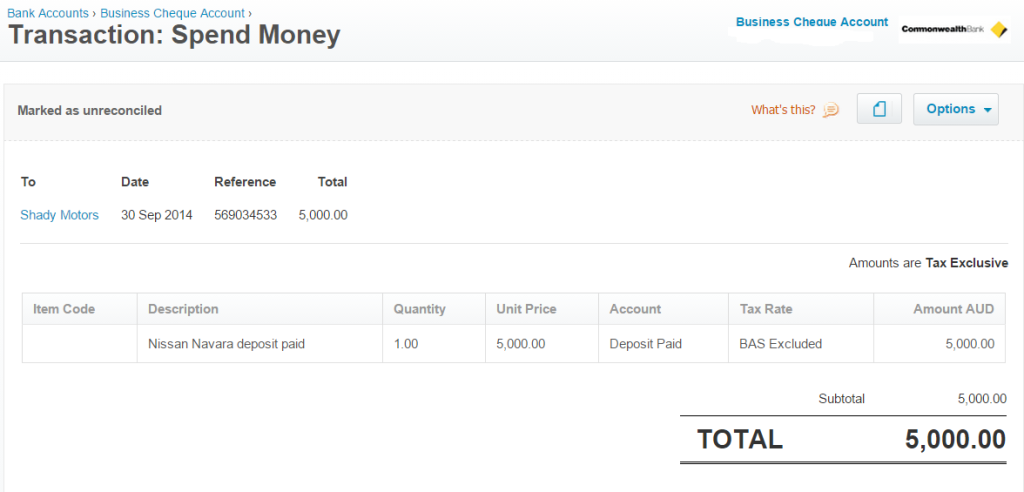
First enter a spend money transaction to record the payment of the deposit:

Step 5

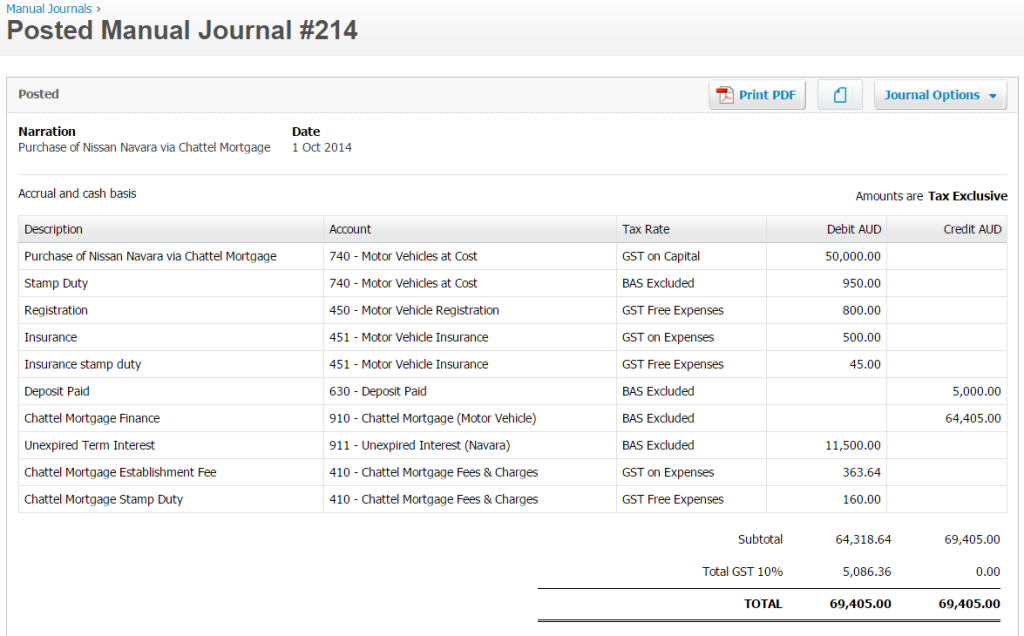
Next, enter this journal to record the purchase of the new vehicle:

Step 6

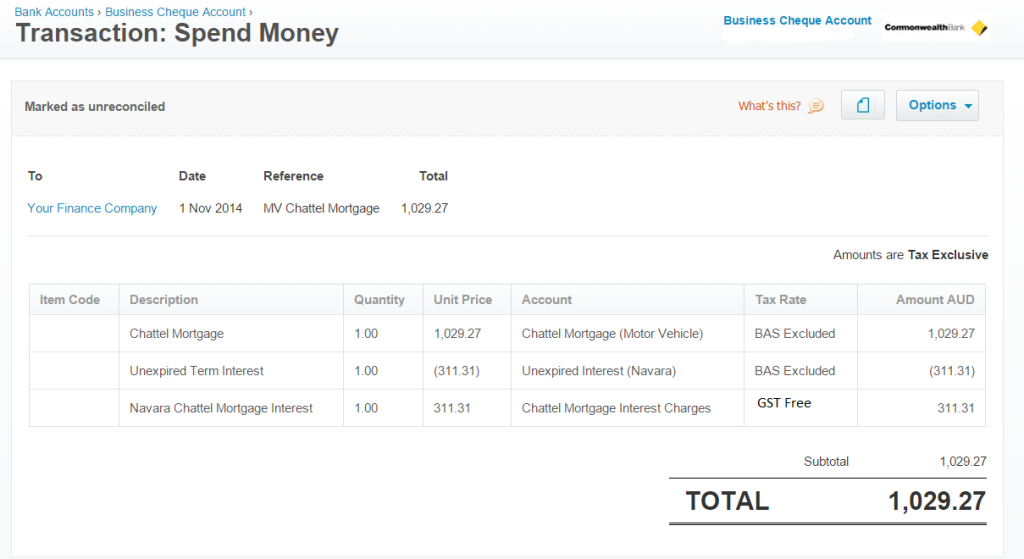
When it comes time to make a repayment to the finance company, enter a spend money transaction like this:

Bonus Tip!

Sometimes it isn’t possible to obtain the loan repayment schedule for whatever reason. When this happens, you need to create your own. I use this amortisation calculator by Bret Whissel. It has served me well over the years. I hope you find it useful too.

Next week for part four of this How-To series, I will cover how to set up a Hire Purchase agreement in your accounts. Until then, happy bookkeeping!

Like it? Share it!

How to Series No 3 – How to Enter a Chattel Mortgage Asset Purchase & Loan Read More »

How to Series No 2 – How to Enter VicRoads Registration Bills

Last week, I started a bookkeeping resource series called “How To”. Each week I will share instructions with you about how to enter some common transactions. I will be using Xero to present the example, but don’t worry if you use another software, the basic rules will still apply. Last week I explained how to enter an insurance bill.

The second how-to is about how to enter a VicRoads registration expense/bill into your accounts.

Step 1

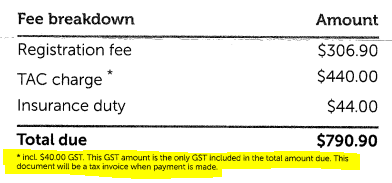
Grab your VicRoads bill and go to the part where it shows you the breakdown of charges. It may look something like this:

Step 2

Log into your software and go to the area where you enter bills.

Step 3

Enter the VicRoads as the supplier, the relevant dates and the reference number or name as below:

Step 4

Enter a line in the bill for each charge shown on the bill. The registration fee is GST-free, the TAC charge includes GST and the insurance duty is BAS Excluded. If you are entitled to claim 100% of motor vehicle costs in your business, then you can claim the full GST amount on the TAC charge. Time and time again, I see clients entering the full amount of the registration expense as GST-free. While they are partly right, they are also missing out on claiming the GST of the TAC charge. Also, relevant here is the choice of account for expense coding – you may like a general account such as this one “Motor Vehicle Expenses”, or you may like to split your costs out in a more detailed manner and have an account for each type of car expense, in this case, “Motor Vehicle Registration”. It just depends on how much detail you want to see in your profit and loss report.

Step 5

Check that the GST amount agrees with the VicRoads bill. In this case, it is $40.00.

Step 6

Approve the bill to ensure the expense is added to the accounts correctly.

Final words…

So that’s it for this week’s “how-to”. I hope you learned something new. One thing I’d like to add about VicRoads “bills” before I close off this blog, is that to obtain an actual bill, you do have to have an account with VicRoads. They used to send out the document in the mail, but not anymore – it’s all online, like everything these days. Here’s the link to VicRoads where you can make an account if you haven’t already done so.

Bonus Tip!

For any bookkeepers out there who know the pain of not ever receiving an actual VicRoads bill from clients (who probably don’t know how to get it – see notes above), which makes data entry nearly impossible, here is the link to the TAC registration rates for FY24. This document provides the breakdown of TAC and insurance duty fees based on postcode and vehicle type. An excellent resource that I am sure you will use time and time again. There is also an online calculator you can use on the VicRoads website that will provide the figures you need easily. Here is the link for the calculator. Either resource will get you the information you need. You’re welcome by the way!

Next week I will show you how to enter a chattel mortgage loan. Until then, have a happy week.

Like it? Share it!

How to Series No 2 – How to Enter VicRoads Registration Bills Read More »

How to Series No 1 – How to Enter an Insurance Bill

This week, I am starting a bookkeeping resource series called “How To” (not very original, I know!). Each week I will share instructions with you about how to enter some common transactions. I will be using Xero to present the example, but don’t worry if you use another software, the basic rules will still apply.

So here goes, the first how-to is about how to enter an insurance bill into your accounts the right way.

Step 1

Grab your insurance bill and go to the part where it shows you the breakdown of charges. It may look something like this:

Step 2

Enter a line in the bill for each charge shown on the bill. In this case, there is one for the premium and one for the stamp duty component. Select the insurance account you want to use – you may have one for business insurance and another for motor vehicle insurance etc. Notice that the premium figure is plus GST, whereas the stamp duty is BAS excluded. This is because stamp duty does not attract GST. It is very important to break up your insurance bill like this and to never enter a bill 100% inclusive of GST. Doing so will mean that you overclaim GST in your BAS.

Step 3

Check that the GST amount agrees with the insurance bill. In this case, it is $38.25 which is one cent less than our bill, hence the rounding line I have added to agree the total amount with the supplier’s bill.

Step 4

Approve the bill to ensure the expense is added to the accounts correctly.

Final Words…

So that’s it for this week’s “how-to”. I hope you learned something new. Please note that this insurance example is pretty basic. Some insurance bills have extra charges which may or may not include GST. The trick to getting these sorts of more complex bills entered correctly is to ensure the GST figure in the bill agrees with your software entry. If it doesn’t, you need to check each charge for its GST status i.e. some items will include GST and others may be GST-free or GST-exempt.

Next week I will show you how to enter motor vehicle registration bills. Until then, have a happy week.

Like it? Share it!

How to Series No 1 – How to Enter an Insurance Bill Read More »

How to speed up data entry in Saasu by using the duplicate feature

Saasu Logo

Data entry into your accounting software is a menial and thankless task but one that most of us have to do on a regular basis regardless. I think most of us don’t like it because it’s so time-consuming and let’s face it, who’s got time to waste these days! If you are using Saasu accounting software, I have good news for you. There is a way to speed up the entry of sales and purchase invoices by using the “duplicate” feature. Watch this “how to” video I prepared to see how it’s done.

Like it? Share it!

How to speed up data entry in Saasu by using the duplicate feature Read More »

How to Set up Items in Saasu

We are trying something different this week for our blog (well different for us anyway!). We have created a video blog as part of our “How to” series for Saasu. Hope you like it. Please leave your comments below and let us know how we can improve our videos or any changes you think should be made etc.

Like it? Share it!

How to Set up Items in Saasu Read More »

How to Create a Sales Invoice in Saasu

Today I am starting a new blog series of “How To’s” in Saasu (and eventually in Xero too :-)). Today’s blog explains how to create a sales invoice in Saasu. Follow these easy-to-follow steps and you’ll be raising invoices by the dozen in no time at all!

Like it? Share it!

How to Create a Sales Invoice in Saasu Read More »

Scroll to Top