Xero

Fully Serviced Novated Leases – How to Set up in Xero

In this blog I will show you how to set up a fully serviced novated lease for a motor vehicle in Xero. Before I begin, I would like to make it clear that every novated lease arrangement is different, depending on the agreement made between the employee and the lease provider. If this “how to” does not seem to match up with your requirements, please seek further advice from your tax agent or the lease provider. I will not be providing advice to readers about their individual requirements for their novated lease set ups, so please don’t ask! Again, seek advice from your tax professional or the lease provider company if you need help.

What is a Novated Lease?

Before diving into the “how-to” of this blog, it’s important to understand what a novated lease is. A Novated lease itself is a type of vehicle financing arrangement involving an employee, their employer and a leasing provider. Essentially, an employee is able to purchase a vehicle AND receive tax concessions under a salary sacrifice arrangement, orchestrated through payroll. Simply put, “to novate” means “to move with,” and in the context of a novated lease, it signifies that the employee’s vehicle and lease agreement can move with them if they change employers.

How a Novated Lease Works

Basically, a novated lease occurs as per the below steps:

  1. An employee chooses a vehicle to buy.
  2. A Leasing Provider provides a lease agreement to the employee which sees the employer take over the rights and obligations under the lease via a “deed of novation”. It should be noted that the deed of novation includes a clause that transfers the lease obligations back to the employee on termination of the lease or when the employee ceases employment with the employer.
  3. The employee and employer enter into a salary sacrifice agreement whereby deductions are taken from the employee’s pay to fund the lease.
  4. The employer pays the leasing provider with the payroll deduction funds. This means the employer is not out of pocket, both from a cash flow and tax perspective.

What is a Fully Serviced Novated Lease?

In this scenario, another party is introduced – a salary packaging provider. This provider will send the employer a reconciliation report the compares the actual motor vehicle costs against the novated lease estimated costs. If there is any variance, an adjustment must be made to the employee’s pre-tax deduction and sometimes, an adjustment is also required to the post-tax deduction.

A fully serviced novated lease includes, not only the lease repayments, but also other vehicle expenses such as:

  • Insurance
  • Maintenance like servicing, repairs and parts
  • Registration
  • Fuel
  • Roadside Assistance
  • Tolls
  • Car washing

This type of novated lease operates in the same way as described above, however it has an extra component which is FBT. The post-tax deduction is known as an Employee FBT Contribution which attracts GST. The employer also claims the GST on the novated lease expenses. The pre-tax deduction is calculated as the novated lease expenses minus the post-tax deduction (GST exclusive).

How to Set up the Fully Serviced Novated Lease in Xero

This “how to” will be based on the following novated lease example:

Sonia works for ABC Industries and is paid $120,000 plus super per annum on a monthly pay cycle. She decides to purchase a vehicle costing $60,000 and asks her employer if she can salary sacrifice the purchase via a fully serviced novated lease. Sonia’s employer agrees with the request and asks Billy’s Novated Lease Services to assist with the facilitation of the lease. Once the lease is in place, Billy’s Novated Lease Services provides the following information to ABC Industries:

The novated lease will be for 5 years and based on the following estimated costs, the fixed monthly amount will be $2,017.08. See the details below:

ITEMGST ExclusiveGSTTOTAL
Lease Payment14,0001,40015,400
Fuel3,0003003,300
Servicing & Repairs2,0002002,200
Registration9000900
Insurance1000851085
Roadside Assistance50050550
Tolls40040440
Car Wash and Vacuum30030330
Total Estimated Annual Costs22,1002,10524,205
Monthly Novated Lease Amount1,841.66175.422,017.08

The fringe benefit figure and related pre and post tax figures are also provided to ABC Industries as below:

Vehicle Cost$60,000
Fringe Benefit Taxable Value$12,000
Monthly Employee FBT Contribution Required$1,000

Post-tax deduction = Employee FBT Contribution = $1,000.00
Pre-tax deduction = GST-exclusive Novated Lease Expenses minus GST-exclusive post-tax contribution
= ($2,017.08 – $175.42) – ($1,000.00 x 10/11)
= $1841.66 – $909.09
= $932.57

The following steps will need to be actioned in order to set up the above lease in Xero:

Step 1 – Add the following accounts to the Chart of Accounts

  • Novated Lease Clearing Accountliability account, current liability; – BAS Excluded tax code; set up a separate account for each affected employee.
  • Novated Lease Expensesexpense account – BAS Excluded tax code; put under payroll costs like wages or super etc.
  • Employee FBT Contributionsrevenue account – GST on Income tax code; place under non-trading income type e.g. “Other Income”
  • Fringe Benefits Tax – needed if an FBT liability arises; expense account – BAS Excluded tax code; place under general overheads.

Step 2 – Set up the payroll tax deductions

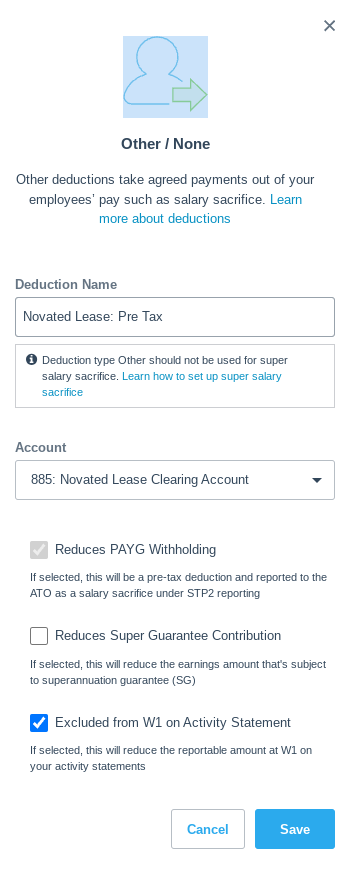
  • Pre-Tax Novated Lease Deduction – reduces PAYG WH; may or may not reduce SG (but shouldn’t); excluded from W1; STP – Salary Sacrifice – Other Employee Benefits (type O); direct this deduction to the Novated Lease Clearing Account.
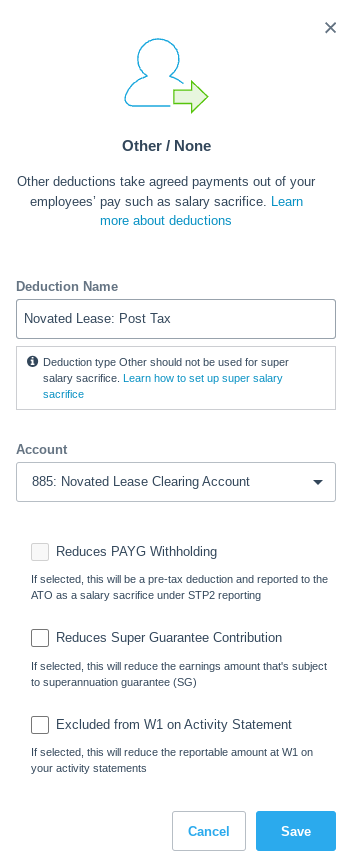
  • Post-Tax Novated Lease Deduction – Does not reduce PAYG WH; Does not reduce SG; Is not excluded from W1; STP – not reportable; direct this deduction to the Novated Lease Clearing Account.

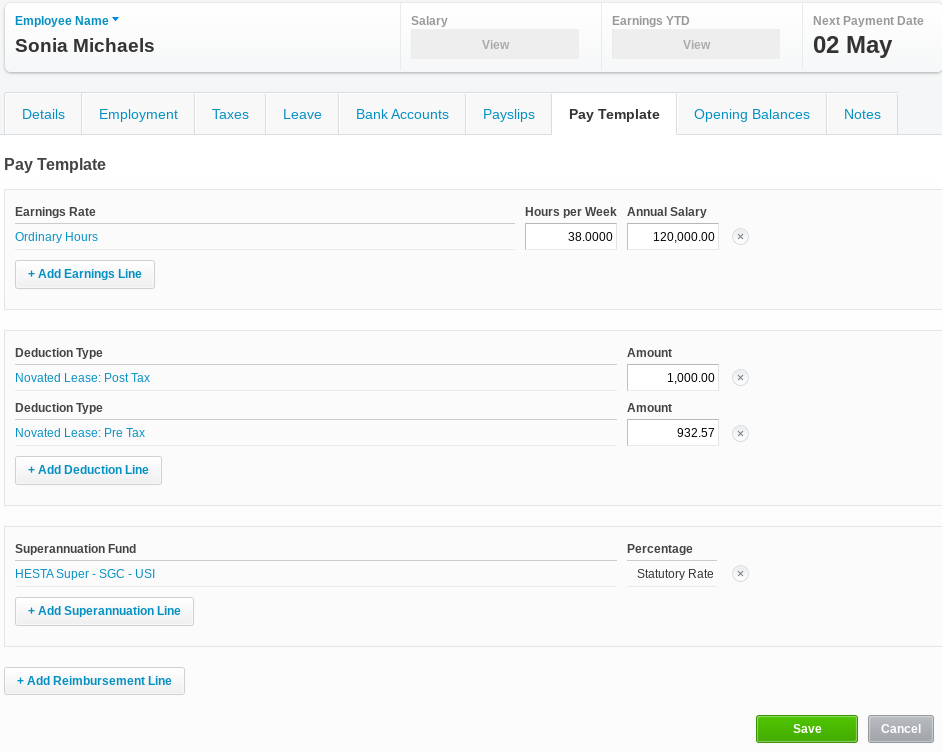
Step 3 – Set up the employee’s pay template & run a pay cycle

Open Sonia’s pay profile in Xero. Add the two deductions as above, then enter the figures provided by the lease provider. See below:

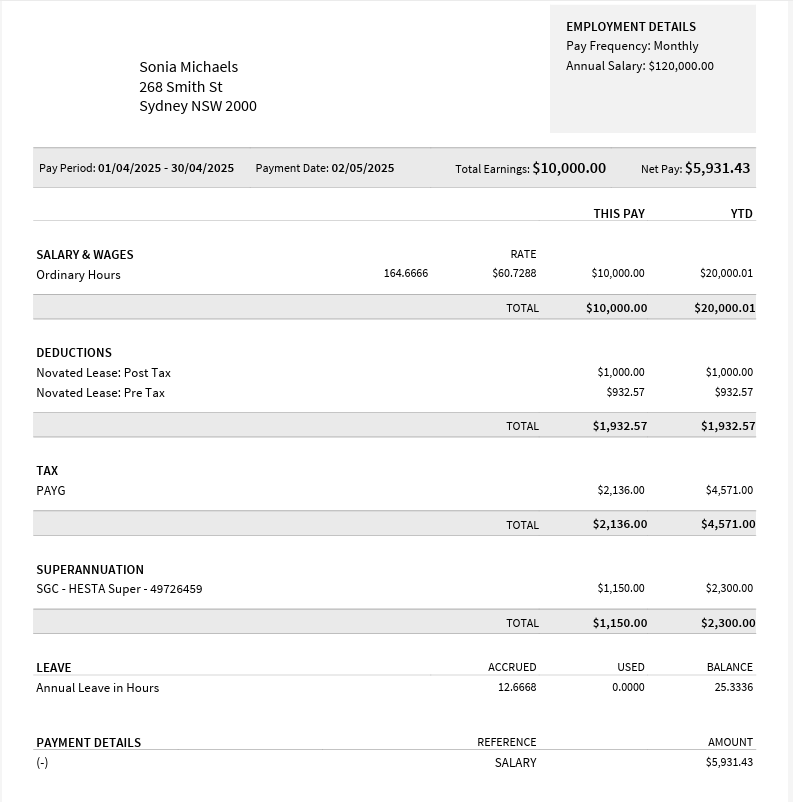
Now process the April pay run in Xero. Sonia’s payslip should look like the below example:

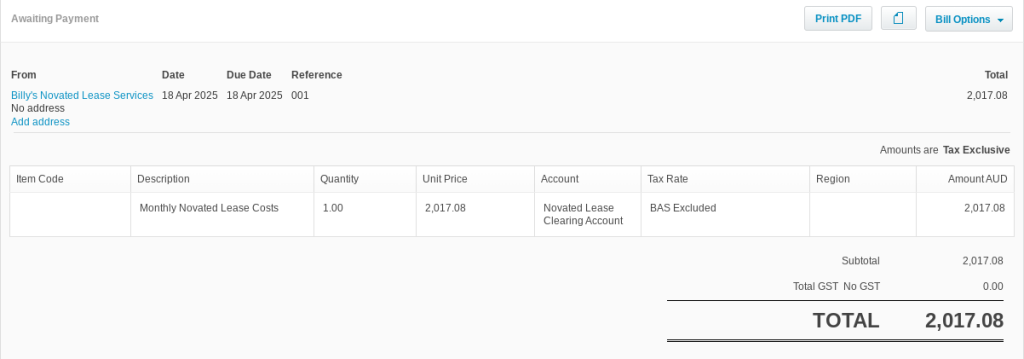
Step 4 – Record the lease provider’s invoice in Xero

In Xero, add the invoice received from the lease provider, “Billy’s Novated Lease Services”. Post the invoice to the Novated Lease Clearing Account with the BAS Excluded tax code. See an example below.

Step 5 – Record GST

There are two GST-related transactions to bring to account:

  1. GST on the novated lease expenses
  2. GST on the post-tax deduction

Each month, Billy’s Novated Lease Services will send ABC Industries a report detailing any GST credits available from the novated lease arrangement from the previous month. For ease of explaining this “how to”, we will assume the GST credits align with the example data. The GST credit therefore is $175.42. Now multiply the GST by 11. This will give rise to a figure of $1,929.62. To recognise the GST from the monthly report, enter the following journal:

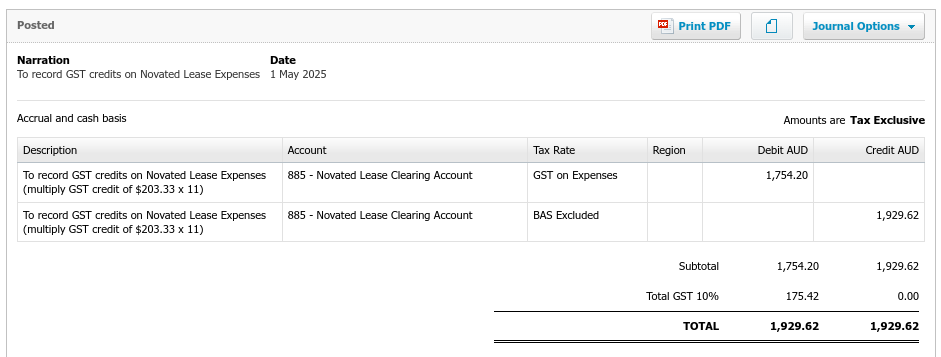
Here, GST of $175.42 will move to the GST control account and become claimable in the BAS. The clearing account will receive net credit of $175.42.

In order to take up the GST from the post-tax novated lease deduction i.e $90.91, enter the following journal:

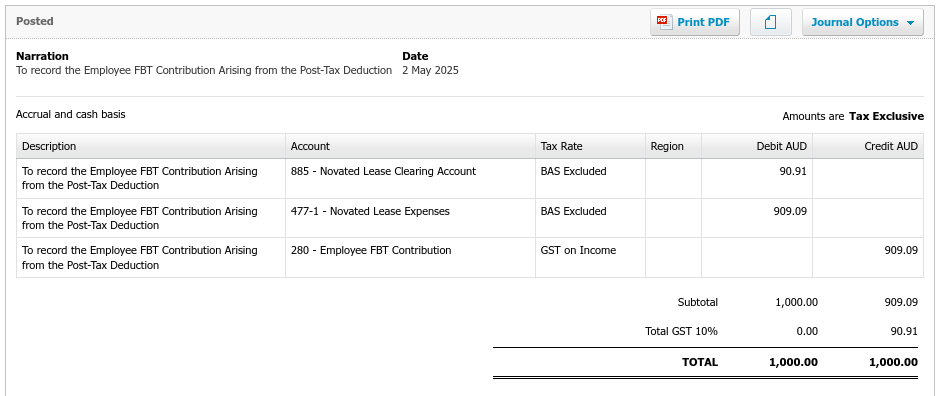
The consequences of this journal will be:

  • $90.91 is credited to the GST control account;
  • The Novated Lease Clearing Account receives a debit of $90.91; and
  • Novated Lease Expenses receives a debit of $909.09.

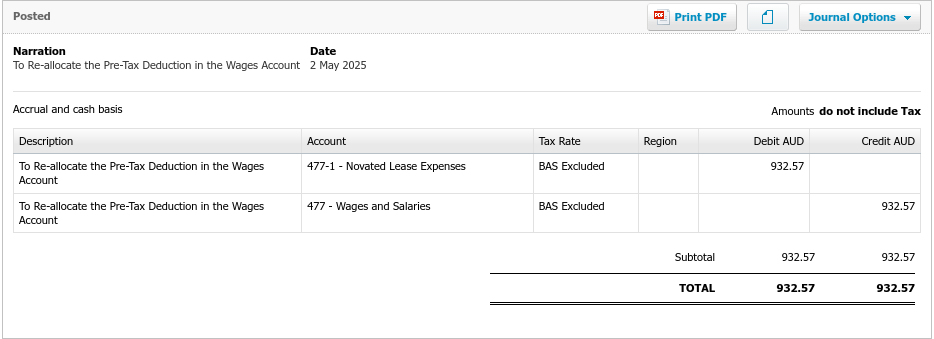
Step 6 – Correct overstated wages

The above payroll event has resulted in overstating the gross wages in the profit and loss. This is corrected by entering the following journal:

Behind the scenes – how are the accounts and the BAS affected by the novated lease?

Now that the above transactions have been processed in Xero, it would be prudent to show you how they affect the accounts and the BAS. Firstly, the novated lease clearing account has been cleared to zero as can be seen below. The account should return to zero each month after the payroll has been processed. If it doesn’t, you will need to investigate to find the cause!

The profit and loss shows the employee FBT contribution as other income and the lease and wage expenses are listed as expected:

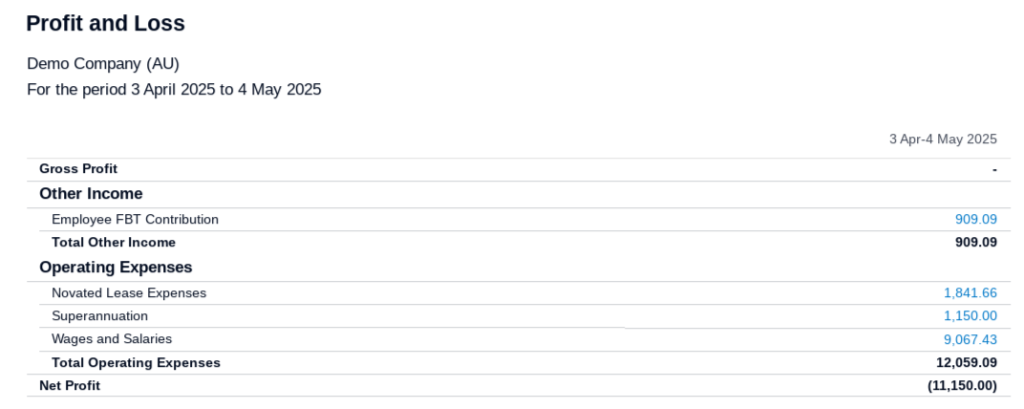
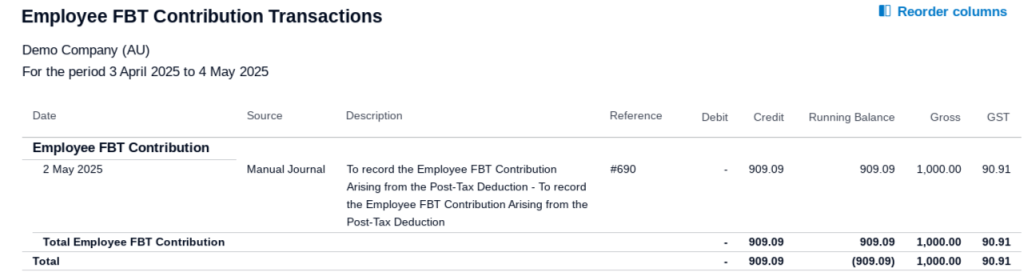
Now let’s drill into each profit and loss account to see the details. Looking at the FBT income I recorded at step 5, we can clearly see the GST posted of $90.91.

Next we can see the details behind the novated lease expenses recorded at step 5 and step 6. The total agrees with the monthly GST exclusive expense amount estimated by the lease provider.

Lastly, looking behind the wages expense transactions, we can clearly see how the wages are reduced by the reallocation of the pre-tax deduction:

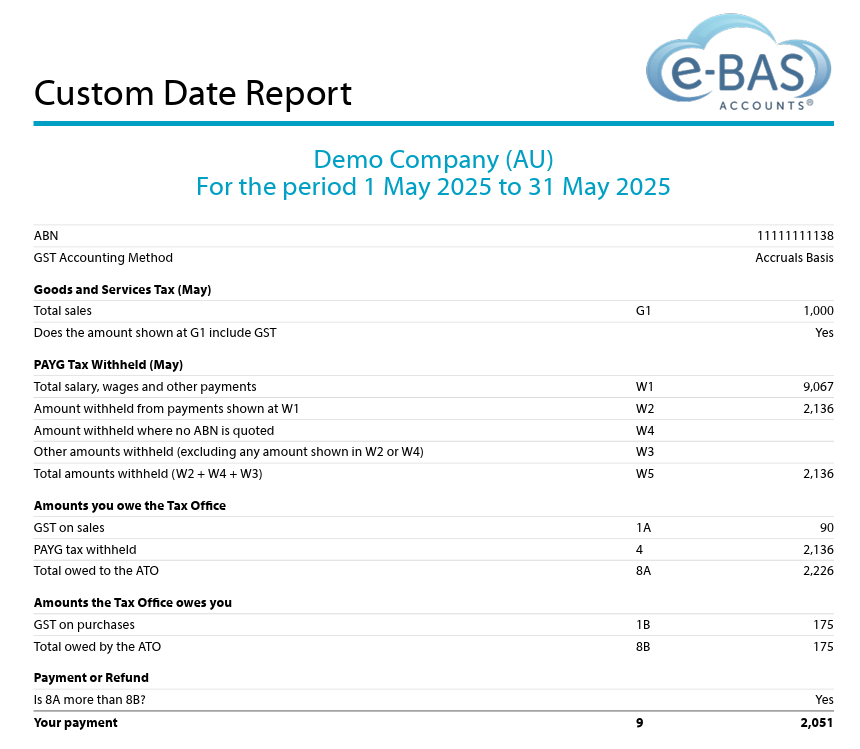
Now we will take a look at the BAS. Note the GST on sales of $90 from the FBT contribution and the GST on Purchases of $175 from the novated lease expenses journal. Also note the reduced gross wages figure which is the correct figure to report to the ATO.

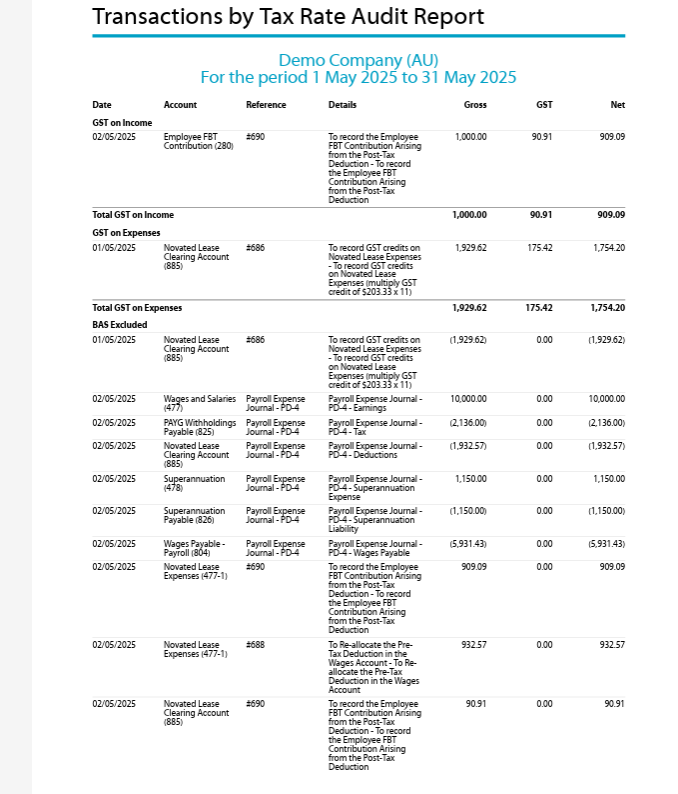
Drilling down into each GST type below, shows us the origin of the figures:

Summary

Setting up a fully serviced novated lease in Xero, as outlined in this guide, offers one approach to managing these arrangements. It’s important to remember that variations in novated lease structures exist, each with its own implications for employee wages and payroll processing. While the data you receive from your lease provider might differ from the steps detailed here, this ‘how-to’ should provide a solid foundation for establishing the necessary accounts and configuring tax deductions within Xero. Please note that I cannot offer guidance on your specific lease agreement, however, I’m happy to address any questions you have about the instructions provided in this blog. Finally, the example figures used in this guide are purely illustrative and should not be evaluated for their financial accuracy or feasibility. The primary goal here is to demonstrate the mechanics of setting up a novated lease within Xero, so please focus on the procedural steps rather than the example’s specific details.

Like it? Share it!

Fully Serviced Novated Leases – How to Set up in Xero Read More »

New from Xero: reprocess failed or returned auto super payments

Xero users who use the payroll function will be pleased to hear that an update has been released whereby failed or returned super payments can now be reprocessed.

Failed Auto Super Payment

If a super payment has failed, the payment authoriser will receive an email notification, outlining the reason for the failure. The status of the payment will change from “pending processing” to “failed”. When this happens, the payment can be reprocessed as the batch will become available for selection in the “Add Super Payment” screen again. Details of the steps required to reprocess failed payments can be found in the above link.

Returned Auto Super Payments

As for failed payments, the authoriser will receive an email if a super payment is returned with information about which employees are affected. Xero can’t tell you why the payment was returned so you will have to contact the super fund affected to obtain those details.

In Xero, the payment status will change to either “partially returned” or “returned”, depending on how many employees are affected.

To find out how to reprocess returned auto super payments, go to the link above.

My Thoughts?

I think this update is an improvement overall, however, the following details from the above link about the timing of the status change to “failed”, have me a bit concerned:

‘This can take up to five business days, with further delays during peak processing times, such as at the end of a quarter. While waiting for the failure message, you can’t update the status of the batch manually.’

Given that the ATO states that “contributions are considered ‘paid’ when they are received by the super fund not when they are paid to the commercial clearing house”, the delays as described by Xero could trigger a Super Guarantee Charge requirement depending on the payment dates involved. This will adversely affect the employer and his/her cash flow, given the SGC increases the super liability overall. This seems a little unfair especially if the employer did pay the SG in a timely manner (or thought he/she did!).

I guess, the only remedy here is to ensure that SG is paid as early in the month as possible so that if any payments are returned or fail, they can be rectified well before the super payment cut-off dates. This issue will become null and void of course, when Payday Super begins (I hope!).

Like it? Share it!

New from Xero: reprocess failed or returned auto super payments Read More »

Xero Tips and Tricks

Xero accounting software is intuitive, fun to use, and an integral piece in the financial arsenal of many small businesses.

Xero has many features and functions and being able to understand them and utilise them correctly is crucial to getting the most out of the product. While most of these features can be learned via Xero’s many blogs, videos, and webinars, it’s often those little unknown tricks and shortcuts that can make all the difference. These tips and tricks not only speed up your work, they just make your bookkeeping life easier – and we all want that!

Here is my list of useful tips and tricks that I use when wrangling Xero. I’ll try to keep adding new tips etc as I discover them. I hope you find them useful. Feel free to share your favourite tips/tricks in the comments below.

  • Inbuilt Calculator – when inside an invoice or bill, and you are entering figures in a numeric field, you can enter a calculation and press tab or enter and Xero will calculate the result. For example, entering 3+7 and then “Enter” will display as the number 10 in the field.
  • Due Dates – Following on from the above tip, when creating a sales invoice or a bill use the + button in the due date box followed by a number to calculate dates in the future. For example, if the terms are 30 days from the date of the bill enter +30 into the due date box and Xero will calculate the date.
  • Keyboard Shortcuts – To go to bills, invoices, contacts, and other sections quickly, enter the forward slash (/) to open the global search field. Then enter b for bills, or c for contacts, or i for invoices etc. Xero will provide you with a quick link to go to all bills, or all invoices etc.
  • Navigating Reports – To quickly get to the bottom of a page, use the End key. To return to the top of the page, use the Home key. If you have a Mac keyboard without the Home and End keys, use Command and the Up and Down arrows instead.
  • Accounts Watchlist – Keep a closer eye on accounts that matter to you e.g. super to pay, by adding them to your dashboard. Do this by going to the Chart of Accounts, opening the relevant account, and selecting “Add to Dashboard Watchlist”.
  • Accounts Watchlist View – This list is organised alphabetically in Xero but that may not be what you want to see. If you want to see a particular account on the top of the list, simply add an asterisk (*) to the front of the name of the account, and voila, it will move to the top.
  • Find and Recode – If you own your Xero file or have advisor access, you will have access to Xero’s Find and Recode function. You can find this at the bottom of the “Accounting” tab. This function allows you to make changes to transactions in bulk – a great time saver!
  • Rectify Wages & Super Transactions Quickly – Use Find & Recode to quickly identify transactions that have been allocated to Wages and Superannuation expense accounts in error. Payroll entries are not picked up so any transactions that are returned are usually misallocated. Quickly finding and reallocating these can save hours of work reconciling the Wages Payable and Superannuation Payable accounts.
  • Xero Issues – keep the Xero Status page in your favourites list. If you are having any issues with Xero functionality, you should check there first to see if there are any known problems. This will save you from submitting a support query unnecessarily.
  • View Multiple Pages – Sometimes you need to view different reports or pages at the same time. You can do this by opening each page or report in separate tabs. Do this by right-clicking the “Dashboard” tab and selecting “Open in new tab”.
  • Prepayments – Rather than trying to remember to enter a monthly journal to take up expense payments for prepaid assets or liabilities, use repeating journals to release the prepayments. This will keep your management accounts current. One less thing to do!
  • Notes – All sales invoices, bills, and contact cards have an area where you can add notes about a transaction or contact. This is best practice in terms of record keeping. Making notes will also assist you or your advisor to understand or remember why an action was taken when accounts are reviewed in the future.
  • Annotations – Related to the above tip about notes, you can also make annotations to your reports which will assist others in understanding what has happened during a specific period or a transaction. To add annotations, simply click on the “add note” icon next to a cell and start typing. Find out how to use annotations here.
  • Split Transactions in Cash Coding Screen – Select a transaction when in the cash coding screen and from the right-hand side click the drop-down menu and select “split”. This will open the Spend Money function (you can also type the forward slash key “/” to achieve the same thing). Type a percentage for the split you require e.g. 50% in the “amount” cell and Xero will calculate the amount for you. Then complete the fields for each split line as necessary and click save. Your transaction will now be split between 2 lines (or as many as required).
  • Using Placeholders in Repeating Journals – if you use repeating journals, you can automatically include information about the period the journal relates. From a draft repeating journal, complete the Narrative box, then click Add placeholder to set up the placeholder you need. See more details here.
  • Share Xero Sales Invoices with WhatsApp and WeChat – Select an approved invoice, click Options, then Share, and then choose your app to share it.

Like it? Share it!

Xero Tips and Tricks Read More »

How to check your transactions before lodging a BAS in Xero

Although there are several ways to check your transactions before you lodge your BAS in Xero, one way to do it is by using the “Detailed Account Transaction Report”.

NOTE! THE DETAILED ACCOUNT TRANSACTION REPORT NO LONGER EXISTS IN XERO (SINCE JULY 2023). YOU NOW NEED TO ACCESS THE GENERAL LEDGER DETAIL REPORT TO MAKE THIS PROCESS WORK!

Here are our step-by-step instructions for using this report:

  • Log into your Xero file.
  • To get to the Detailed Account Transaction Report (DATR), go to the “Accounting” tab, then “Reports”, then “Accounting”, then DATR.
  • Select “wide view”
  • Enter the date range of your BAS.
  • Sort by account code.
  • Choose “cash basis” if your BAS is cash-based.
  • Select “update”. Note that you will now see 2 columns – one for GST rate and one for GST name.
  • Export the report to Excel.
  • Sort the column for GST name by A to Z. Here is a link for how to do this if you aren’t sure.
  • Review the transactions, making note of any errors or issues.
  • Go back to Xero and amend any transactions as required.
  • Save and/or publish the report with your other BAS reports for your records. You can now complete your BAS, satisfied that the data is accurate.
  • Add the DATR to your favourites list so you can find it easily when you do your next BAS.

Like it? Share it!

How to check your transactions before lodging a BAS in Xero Read More »

How to set up STP in your accounting software – part 1 – Xero

If you’re a small employer with 19 employees or less, you have until 30 September 2019 to connect your accounting software to the ATO for Single Touch Payroll (STP) purposes. If you haven’t yet done so because you simply don’t know how to do it, then this blog is for you! This will be a four-part series beginning with Xero software. We will cover Saasu, MYOB and QuickBooks Online in subsequent blogs.


Connecting your Xero file for STP

Before proceeding with the connection, it is advised that you review and update your organisation details and also all employee details like dates of birth, tax file numbers and residential addresses. It is also advised that you check your payroll set up especially pay items and ensure they are correct. Your tax professional can assist with this if necessary.

Here are the steps you need in order to connect:

  1. In the Payroll menu, select “Pay employees”.
  2. In the message about Changes to the way you report payroll information to the ATO, click “Get started”.
    If you don’t want to opt-in right now, close the message by clicking Remind me later. To reopen the message, click Setup Single Touch Payroll.
  3. Click Opt-in to confirm.
  4. Review your organisation details. If necessary, click Update Organisation details. Xero will redirect you to the Organisation details page. Otherwise, click Continue.
  5. To connect your Xero account to the ATO, call the ATO on 1300 852 232. If you use the ATO business portal or have a myGov account, you can also log into Access Manager and nominate Xero as your software service provider there – a bit easier than calling the ATO!
  6. Provide the ATO with the proof of ownership listed in Xero’s prompt, including your Australian Business Number (ABN) and Software ID (SSID).
  7. Select the checkbox to confirm you’ve contacted the ATO to connect your Xero account.
  8. Click Register.

Xero will redirect you back to the Pay employees page. You’ll now see an STP filing column in the Pay Run History table.

Once you’re set-up, the option to report a payment to the ATO will be presented for each pay run and your payroll information will be filed with the tax office each time.


I need more information

No problems! Here is the link to the Xero blog about connecting for STP – includes details for business owners and tax professionals connecting on their clients’ behalf.


In part 2 of our blog series, we will look at how to connect MYOB software for STP purposes.

Like it? Share it!

How to set up STP in your accounting software – part 1 – Xero Read More »

Single Touch Payroll – is your accounting/payroll software ready?

Single Touch Payroll (STP) is formerly starting on 1 July 2018 for employers of 20 or more staff. So if you fall into this category, do you know if your accounting software is going to be ready by the start date? In today’s blog, we outline who will be ready and who is lagging behind!


We wrote about STP in our blog in May last year and in that blog we explained what STP actually is:

“STP is a government initiative requiring employers to report their payroll information to the ATO including gross wages paid,  PAYG withholding tax and superannuation at the time a payrun is created i.e. every payrun. The reporting will occur directly from your chosen payroll software solution.”

So basically, each time a pay run is completed, the information about who was paid, how much they were paid, the super accrued and the tax withheld, is sent electronically to the ATO via your accounting software (or other external payroll software). If you are a large employer, your business needs to start using STP from 1 July 2018 and you can only do this if your accounting or payroll software is going to be ready on time. Here is a list of the software companies who claim that they will be ready by 1 July 2018………. and those who won’t be ready! Also included are links to the various software blogs which explain their STP status and what you need to do now if you use that software.


Who will be ready on time?

From MYOB link above: “Single Touch Payroll is almost here and MYOB is working directly with the ATO to ensure that you’re ready to go when it becomes mandatory on 1st July 2018 for businesses with 20 or more employees. All of MYOB’s payroll enabled solutions will be compliant prior to the reporting date and deliver an easy-to-use solution to make this transition as smooth as possible.”

From the QBO link above:

“Will QuickBooks Online Payroll powered by KeyPay support Single Touch Payroll?

 
Yes, absolutely! We’re already investigating the requirements for STP reporting and will commence our implementation soon. The ATO are planning to release more information for software developers in Oct 2017 so as soon as that is available, we’ll begin our build.

We don’t have an ETA on when it’ll be ready to use, however we will definitely be ready before July 1 2018.”

From the Saasu link above: “We have already started work on Single Touch Payroll reporting within Saasu. We don’t have a fixed date on when it will be ready to use, but we will definitely be completed before July 1, 2018. We’ll make sure you know when the STP reporting functionality gets rolled out. STP will be included in your file automatically, without you needing to update, and without additional upgrade costs.”

From the Reckon link above: “All Reckon products with Payroll functionality will be STP enabled and ATO certified by 1 July 2018. This includes Reckon One, Reckon Accounts Desktop, Reckon Accounts Hosted and Payroll Premier. Reckon is part of the Australian Business Software Association who are working collaboratively to help shape and influence the design and implementation of Single Touch Payroll.”

From the CP link above: “STP reporting comes into effect on the 1st July 2018 and will be offered as part of CloudPayroll’s standard services.”

Who won’t be ready on time (and has applied to the ATO for a deferral)?

From the Xero link above: “Australia’s 1 July deadline to adopt Single Touch Payroll (STP) is fast approaching. But if you or your clients are on Xero, there’s some good news: You may have extra time. Thanks to the ATO, Xero subscribers will have a deferral of as much as six months to ensure a smooth rollout of STP.”

So basically, some Xero users will have access to STP on 1 July 2018 and others will be introduced to it later via a rollout system: “The Xero platform will invite you to use STP when it’s time to make the switch. Until then, you can process payroll as normal, without incurring any penalty. It’s that simple.”

From the MYOB other link above: “Clients who are unable to move to an STP enabled version of AccountRight, because they are currently using multi-currency, negative inventory, multi location inventory, M-Powered Payment or ODBC and those using AccountEdge, have been granted an STP reporting deferral until 31 May 2019. Others are encouraged to move to the latest version of AccountRight to ensure you are ready to meet your STP reporting obligations. “

What can I do if my software will not be ready for STP implementation by July 1 2018?

If your software isn’t going to be ready for STP by 1 July 2018, it’s developers will apply for a deferral and will be able to provide you with a deferral reference number (DRN) which you can then quote to the ATO to advise re the delay.

NB! If your business will not be ready for STP and the reason is not related to software delays, then you will have to apply to the ATO for a separate deferral yourself. If you engage a registered BAS or Tax Agent, then he/she can apply for a deferral on your behalf – see notes from the ATO below:

“Deferrals

Employers who won’t be ready to start STP reporting from 1 July 2018, or by their software provider’s start date, will need to apply to us for a deferral.

Registered agents providing a payroll service, or supporting employers to transition to STP, can apply for a deferral for their clients. This includes registered tax agents, registered BAS agents and payroll service providers.

You must be a registered tax or BAS agent external Link to report through STP for your clients or apply for a deferral on their behalf.


So in summary, most of the popular accounting software giants will be ready for STP come 1 July 2018 and some won’t be so ready! If your software or business won’t be ready, then a deferral application to the ATO is required. If you would like more information re STP and/or assistance with the deferral application, please get in touch – we’d be happy to assist!

[highlight color=”blue”] NB! If your chosen accounting/payroll software isn’t listed here in this blog, we advise that you contact that software immediately to find out their STP status! [/highlight]

Like it? Share it!

Single Touch Payroll – is your accounting/payroll software ready? Read More »

How to make journals in Saasu & Xero more useful

One of the most useful features found in cloud-based accounting software such as Xero and Saasu is the ability to upload and attach documents to various transactions. This is great because it means that not only are you complying with your record keeping requirements, but you can also verify your purchases with others. By “others” I mean your accountant, bookkeeper and yes, the ATO should they ask for supporting evidence. Most Saasu and Xero users will be aware that they can upload and attach source documents to sales and purchase invoices. What they may not be aware of is that you can also attach documents to journal transactions. Today I will show you how this done in Saasu.

Saasu Logo
Like it? Share it!

How to make journals in Saasu & Xero more useful Read More »

Virtual Bookkeeping? Please Explain?

Okay so you run a small business and things are super busy! You’ve got lots to organise – employees, clients, projects, supplies, website, marketing and dare I say it, yes, the bookkeeping and tax compliance tasks! Some business owners prepare their own books but many are outsourcing the task to professional bookkeepers instead. Some prefer to employ an onsite bookkeeper but others have chosen to use the services of virtual bookkeepers. They have done this for various reasons, the main ones being:

  • As small business owners, they are probably operating a home-based business and do not want someone regularly coming into their home/family space.
  • They operate from a formal office which does not have the space for another worker, desk and equipment etc. or
  • Their business is primarily mobile and as such, they don’t really utilise a physical office.
So just what is a virtual bookkeeper and how does virtual bookkeeping work? What are the pitfalls or cons or virtual bookkeeping? Today we answer these questions and more……..

A virtual bookkeeper is someone who works remotely, utilising current technologies and the internet to complete bookkeeping and other tasks for his clients. Virtual bookkeeping is not location-dependent. A virtual bookkeeper can offer services to clients Australia-wide (or perhaps worldwide), without leaving his office. The internet, current technologies and cloud services all make this possible. At e-BAS Accounts, while we do have some local clients whom we see in person, we are essentially virtual bookkeepers and maintain clientele in several Australian states even though we are Victorian-based. To ensure the virtual relationship runs smoothly, we use a system which we will share with you today. Here is a summary of how our virtual bookkeeping system works. If  you would like to read the extended version, head here.

Like it? Share it!

Virtual Bookkeeping? Please Explain? Read More »

Scroll to Top