Payday Super is a government reform that will require employers to pay Super Guarantee contributions on or soon after each payday, instead of making contributions quarterly or monthly. The new rules begin on 1 July 2026. The intent is to reduce unpaid/late super, give employees more timely contributions into their funds, and give the ATO closer to realtime visibility of employers who fall behind.
This dashboard has been created to provide employers with resources and insights to help them understand Payday Super and prepare for its impact. Use the dashboard to navigate Payday Super rules and prepare your business for the transition.
Note: As of March 2026, legislation and regulations relating to Payday Super are still in the process of being finalised by Treasury and the ATO. The information provided in this dashboard will be updated as and when the details are finalised.
The Australian Government has passed the Payday Super legislation and it has received Royal Assent. Payday Super will take effect from 1 July 2026. This new law requires employers to pay superannuation guarantee (SG) contributions on payday and ensure that funds reach employees’ super accounts within seven business days, instead of quarterly or monthly. If you’re an employer, this blog will help you understand how Payday Super will affect your payroll processes.
What employers need to know
Payment Timing:
1. Super must be paid within seven business days of each payday.
2. If a new employee is hired or an employee changes their super fund, first-time payments must be received by the fund by the end of the 20th business day and after each payday.
3. Super on out-of-cycle or bonus payments may be included in the next regular pay cycle, however this does not apply to the termination of employees.
4. The ATO May extend time-frames for events such as natural disasters or systems outages.
Qualifying Earnings: The law introduces the concept of ‘qualifying earnings’ for super calculations. This concept will replace the dual “salary or wages” vs “ordinary times earnings” model. One qualifying-earnings base will simplify administration. It is important to note that amounts which are salary sacrificed to a superannuation fund count toward qualifying earnings and cannot offset required SG.
Maximum Contributions Base (MCB): The maximum contributions base will now be an annual limit, as opposed to quarterly. The calculation will be Concessional Cap x 100 divided by the current SG rate i.e. $30,000 x 100 divided by 12 = $250,000.
Stricter Penalties: There are tougher penalties for late or missed payments. As per current rules, should contributions be missed or paid late, a penalty known as the Superannuation Guarantee Charge (SGC) is created which includes interest and penalties. This won’t change under Payday Super rules, however the penalties will be more robust including:
Administrative uplift: 60 % of unpaid amounts (may be reduced by regulation);
Late-payment penalties: 25% – 50% of outstanding charge if not paid within 28 days of notice;
Additional ATO penalties: up to 200 % for repeated or unreported breaches.
Tax Deductibility: Late contributions and the SGC will be tax deductible. However, any late payment penalties related to the SGC will not be deductible.
Onboarding: The process for onboarding new employees will need to be more streamlined in order to minimize fund rejection errors, such as incorrect employee master data and choice of fund information. Employers need to consider automated solutions to replace manual processes.
What employers should do now
Update Payroll Systems: Ensure your payroll software can process super payments on every payday. Also ensure that the super funds you pay are ready for Payday Super.
Educate Staff: Inform payroll and HR teams about the new requirements. Also inform your employees.
Review Staff Contracts: The advent of Payday Super will require changes to the wording in employee contracts. It may also affect remuneration for some employees – this requires close scrutiny and review.
Monitor Compliance: Regularly check that payments are made on time to avoid penalties. Running some test scenarios prior to the advent of Payday Super would be prudent. This would allow employers to iron-out the kinks and deal with potential bottle necks and issues.
Change to Payday super Now: You don’t have to wait until Payday Super begins in July 2026. You can start doing it now as long as your processes and software are up to par. If you start now, you will be able to ensure that all or any issues are removed before Payday Super becomes compulsory.
My opinion
Because it is a pet-hate of mine when employers don’t pay employees’ super on time (or at all), I am 100% in support of Payday Super. This new law will ensure that super gets into employees’ super accounts on time and regularly, rather than quarterly, or longer, or sadly, not at all. More regular super payments will see employees’ super balances increase due to higher interest accrued. All good in my book.
I do note, however, that there will be logistical issues such as the super funds not processing the payments within 7 business days and employers paying the super towards the latter end of the 7 day period. This in turn could expose employers to late payment penalties which may occur through no fault of their own. The tight processing time-frame is definitely going to be a problem.
There will also be cash flow issues for employers. Employers will need to ensure that they have enough funds on hand to pay super on payday, from 1 July 2026 and for each and every payday going forward. The current 3 month grace period will be no longer which could put many employers under considerable cash flow stress. Management of cash flow will become extremely important.
Another issue could lie with software companies not being ready to cope with these changes by 1 July 2026, given this is only 7 months away! This is unlikely, but definitely possible.
Lastly, those employers who outsource the processing of payroll will be hit with higher charges due to the extra administration required on payday to process super payments. What would have been a quarterly or monthly job will now become a weekly, fortnightly, bi-monthly, etc. job, depending on the pay cycle used. This aspect will also affect employers’ cash flow!
Payday Super won’t be without its hiccups, but I do believe it will vastly improve the superannuation system, ensure employees are better off, and stop rogue employers from ducking and weaving when it comes to paying employees’ super.
Key Takeaways
The Australian Government passed the Payday Super is law, requiring employers to pay superannuation contributions on payday from 1 July 2026.
Employers must ensure super payments are made within seven business days and streamline onboarding processes to reduce errors.
The new law introduces ‘qualifying earnings’ for super calculations and a stricter penalties regime for late payments.
Employers should update payroll systems, educate staff, review contracts, and monitor compliance ahead of the change.
Despite potential cash flow issues and logistical challenges, the Payday Super law aims to improve employee superannuation outcomes.
Every year, as we approach the Christmas break, I like to remind employers and employees about their rights and responsibilities in terms of taking leave and how this relates to public holidays. This blog will address this issue and help you all plan your payroll for the upcoming festive season.
All businesses are different and have varying requirements during the festive season. Some shut down completely, while others remain open, even on public holidays.
Shutdowns
If your business shuts down at Christmas, you can give your employees the direction to take annual leave for the shutdown period. Your direction must be reasonable, in writing, and provided to all affected employees. If your employees are covered by an award or enterprise agreement, you do need to check the rules relating to shutdown and directing employees to take leave, because all awards and agreements are different. If no award or agreement applies, employers can only direct the employee to take annual leave if the direction is reasonable.
Employees without enough accrued annual leave
Sometimes, employees may not have accrued enough annual leave to cover the full period of a shutdown. In this case, employers can agree to allow an application for annual leave accrued in advance or for unpaid leave. Whatever is decided, it is important to check the rules in the award if one applies, and to put all decisions made in writing.
Working during the festive season
If your business remains open during all or some of the festive season, the rules for taking and paying leave are fairly simple. Workers need to receive their normal pay while they work and be paid for any public holidays that they take off. If they work on a public holiday, workers need to be paid public holiday rates which are listed in all awards.
Employers may request that workers do overtime during the festive season, including on public holidays. However, this request must be reasonable, taking into consideration the needs of the business and the employees’ personal commitments. Again, this is driven by the relevant award and/or the employees’ contract, if they are award-free. Remember, if employees work on a public holiday and do overtime on that day, they may be eligible for penalty rates, another day off or extra annual leave – check your award to clarify the details.
Not working on a public holiday
If an employee doesn’t work on a public holiday, they must be paid their base rate for the ordinary hours they would have worked. Public holidays are not deducted from the employee’s accrued leave balance, so ensure that all leave applications do not include any public holidays before approving them. These rules also apply during a shutdown. It’s important to note that employees should be given the choice to work on a public holiday, should they wish to do so.
Employers can direct employees to take annual leave during shutdowns, but the direction must be reasonable and in writing.
If employees lack sufficient accrued annual leave for a shutdown, employers can grant unpaid leave or annual leave in advance with proper documentation.
Employees working during the festive season must receive normal pay, and those working on public holidays need to be compensated at public holiday rates.
Employees not working on a public holiday should receive their base hourly rate for hours missed, not affecting their accrued leave.
Consult relevant awards and agreements for specific leave entitlements and payroll guidelines during the festive season.
Many businesses engage the services of professional bookkeepers, either as contractors or employees. These workers are involved in various aspects of a business’ operations, including sales, purchases, bank reconciliation, payroll and much more. But did you know that some services a bookkeeper provides are known as “BAS services” and some are basic bookkeeping services? There is a difference! In short, basic bookkeeping tasks and BAS services are not the same thing. Why is this important and why should business owners understand this concept? Read on to find out and to obtain a free bonus list of BAS services for your future reference.
Difference between bookkeeping and BAS services (and why it matters)
The Tax Practitioners Board (TPB) has a clear distinction between basic bookkeeping tasks and BAS services. They’ve made this distinction for a crucial reason: to ensure that only registered BAS agents perform BAS services for a fee. If an unregistered bookkeeper provides these services, they’re breaking the law.
This rule applies to external contractors. If you hire a bookkeeper as a contractor, it’s your responsibility as the business owner to ensure they are a registered BAS agent if you need them to perform BAS services. Conversely, if you have an employee bookkeeper, the TPB’s rules don’t apply, as the business owner is responsible for the accuracy of their work.
It’s a common misconception that all bookkeepers can handle all accounting tasks. Unregistered bookkeepers can only provide very basic services. Asking them to process payroll, for example, is technically illegal, as payroll is considered a BAS service. Let’s take a closer look at the differences.
What’s Considered a Basic Bookkeeping Task?
According to the TPB, an unregistered contractor can only provide basic bookkeeping services. These are generally the day-to-day tasks that help a business maintain its financial records. Examples include:
Bank reconciliations and data entry into an accounting system.
Processing payments.
Record keeping.
Collating and printing reports, such as draft Profit and Loss statements.
Coding transactions to accounts based on instructions from the client.
What’s Considered a BAS Service?
A registered BAS agent, on the other hand, can provide a much wider range of services. The TPB has a detailed list, but some of the most common BAS services include:
Preparing and lodging BAS (Business Activity Statements) and IAS (Instalment Activity Statements).
Preparing and lodging payroll through Single Touch Payroll (STP).
Calculating and lodging superannuation guarantee contributions.
You can download the full list from the TPB below for future reference.
It’s very common for business owners to hire external bookkeepers, but it’s essential to check their credentials. If a bookkeeper is not a registered BAS agent, they are legally limited to providing only basic bookkeeping tasks. It is illegal for them to charge for and perform BAS services.
Hiring an unregistered bookkeeper to handle BAS services not only puts you and your business at risk but also means the person may not have the necessary qualifications or experience to perform those tasks correctly.
The takeaway is simple: if you only need basic record-keeping, a non-registered bookkeeper may be a good fit. However, if you need someone to handle payroll, BAS, or other more complex services, you must hire a registered BAS agent. Always verify who you’re engaging and what services they are legally allowed to provide.
Key Takeaways
BAS services and basic bookkeeping tasks differ significantly, with specific legal restrictions around who can perform BAS services.
Only registered BAS agents can legally provide BAS services, while unregistered bookkeepers are limited to basic tasks.
Basic bookkeeping tasks include bank reconciliations, data entry, processing payments, and record keeping.
Common BAS services include preparing and lodging BAS, payroll through STP, and calculating superannuation contributions.
Business owners must verify a bookkeeper’s registration to avoid legal risks and ensure the correct handling of financial tasks.
The Victorian Government is once again increasing the tax burden on Victorians, and this time, homeowners running businesses from their properties are in the cross-hairs.
The State Revenue Office of Victoria has begun auditing homeowners who operate businesses from their residences, including those working from a home office, shed, or garage.
Understanding Land Tax
Land Tax (Vic) is an annual tax calculated on the total taxable value of all land you own in Victoria as of December 31st of the preceding year. Typically, your Principal Place of Residence (PPR) and primary production farmland are exempt. However, starting in 2024, the Land Tax threshold (General Rate) was significantly reduced from $300,000 to $50,000. This change means a substantial increase in the number of Victorian landowners now liable for land tax.
Impact on Home-Based Businesses
If you run a business from your home, you might now be liable for land tax on your PPR. Here’s what they consider: **Income: Whether your business generates $30,000 (gross) or more in income. **Space Usage: If more than 30% of your home’s land or building area is used, even partly, for business purposes. **Employees/Contractors: If you have paid employees or contractors (excluding relatives living on the property) working on your land. **Permits: If a council permit is required for your business activities. **Deductions: The extent and nature of income tax deductions claimed for your business.
How is the Tax Calculated?
The land tax is apportioned based on the floor space or land area used for your business. For instance, if your home office occupies 30% of your total home’s floor space, you’ll be charged 30% land tax on the non-exempt portion, once the taxable value of your land reaches $50,000.
My Opinion
As a person who also runs a home-based business, I share the deep frustration felt by many Victorians regarding this expansion of land tax. At a time when the cost of living is already a significant challenge, imposing new and unexpected tax burdens on hard-working self-employed individuals seems profoundly unfair.
While I believe in a fair and equitable tax system, the rationale behind taxing a portion of one’s Principal Place of Residence simply for operating a home-based business lacks proportionality. This approach raises serious questions about the government’s strategy for addressing its financial position, as it appears to be relying on broad taxation measures that could inadvertently stifle small business growth and impact the financial security of homeowners in general.
This policy risks diminishing the hard-earned equity that many small business owners have built in their homes. If you run a home-based business in Victoria, I encourage you to consider the implications of these changes, as I believe it’s a critical issue that deserves immediate attention.
For small business employers and their employees, Australia’s new Right to Disconnect Laws became effective on August 26, 2025. These laws will empower employees to switch off from work outside of their regular hours, enabling them to achieve a better work-life balance. Having the right to disconnect means employees can refuse to answer calls, emails, texts, and other messages from their employer or third parties—like clients, customers and suppliers —unless the request is unreasonable.
Watch the below video from Fair Work for an indepth overview of the Right to Disconnect Laws for Small Businesses:
Crafting a Fair Policy
The Right to Disconnect laws require every business to review how team members communicate with each other and more specifically, when. It is best practice once this review is completed, to create a clear and effective Right to Disconnect policy that all team members will follow. Since the expectations for after-hours contact can vary greatly depending on employees’ positions, it is crucial to have open conversations and document the agreed-upon standards. The policy should define what reasonable and “unreasonable” contact means for a specific workplace and individual roles.
Regularly reviewing and updating this policy will help ensure it continues to support both the business’s needs and the well-being of its employees.
As a bonus for those who are reading this post, I have created a Right to Disconnect policy template. Download it for free below.
The following video from Fair Work, provides information about having discussions with employees about these new laws. These “discussions” will assist in crafting a policy that best suits the needs of the employees, and will help them understand their rights and those of the business.
For more information about the Right to Disconnect and to view examples, visit this Fair Work webpage.
If your business has outstanding invoices, and let’s face it, most businesses have them, your cash flow is probably suffering. This isn’t great when you have to pay rent, payroll and suppliers etc. Enter FundTap.
FundTap, is a fintech innovator transforming invoice financing. They offer a flexible way to access funds tied up in unpaid invoices, empowering businesses without traditional lending hurdles.
Unlock Your Working Capital, On Your Terms
FundTap provides short-term funding solutions tailored to your needs, whether for a single $1,000 invoice or multiple invoices up to $150,000. Their pay-as-you-go model removes ongoing repayments or lengthy contracts, giving you control over your finances.
Speed and Simplicity at Your Fingertips
Skip lengthy applications and paperwork. FundTap’s online application and integration with platforms like Xero, QuickBooks Online, MYOB, and Reckon allow you to receive funds in hours. This will assist you to cover urgent expenses and improve your cash flow.
As Claire Reuss, Relationship Manager at FundTap, notes, “Getting finance as a small business is often a struggle. Many SMEs wait 60 to 75 days for payments while needing to cover rent, payroll, and supplies. FundTap solves this by giving quick access to funds tied up in unpaid invoices.”
Flexibility That Fits Your Business
FundTap stands out with:
No establishment fees: Saving you money.
No contracts: Use services only when needed.
No minimum funding requirements: Even small invoices unlock capital.
This inclusivity benefits businesses of all sizes across various industries.
Effortless Repayment: Automation at its Best
Because FundTap is connected to your accounting file, it can detect when your customers have paid invoices. FundTap will then initiate direct debit for the advanced amount plus a small fee. This integration saves time and ensures efficient repayment. If payments are late, FundTap adjusts the debit date. Early repayment incurs no extra fees.
Getting Started is Simple:
FundTap’s setup process:
Firstly, FundTap will ask you to answer some questions to ascertain your eligibility for funding – see below:
Does your business operate in Australia or NZ?
Do you invoice for services/goods?
How long have you been operating? (0-3 months, 3-12 months, 12+ months)
What is your average monthly turnover? (Under $5,000, $5,000 – $50,000, $50,000 – $500,000, $500,000+)
If your business is eligible, then all you have to do is follow these simple steps to get set up:
Connect your software: Connect FundTap to Xero, QBO, MYOB or Reckon.
Select the invoice/s to fund
Receive funds within hours from FundTap
Automated repayment: FundTap will direct debit your account once your customer pays you.
Take Control of Your Cash Flow Today
Don’t let unpaid invoices hold you back. FundTap offers a modern, flexible way to access working capital, allowing you to focus on growing your business.
Disclaimer
This post is shared with our blog readers for their benefit only. The information provided has come from the Australian Bookkeepers Association, of which I am a member. e-BAS Accounts is not affiliated with FundTap and does not receive commissions from FundTap for this post.
In that last couple of weeks, I have had 2 new clients ask me if they need to register for GST. Given that the answer is not entirely straightforward, I thought I would share the answer I gave these clients with my blog readers as it could help another business owner who may be considering the same thing.
Registering for GST is dependent on some variables. These are listed below:
Compulsory GST Registration
You or your business must register for GST if any of the following apply:
Claiming Fuel Tax Credits (required, regardless of turnover)
Providing taxi/limousine services (required, including ride-sharing)
Exceeding the turnover threshold: (required if your projected or current GST turnover is $75,000 or more ($150,000 for non-profits)). “Turnover” is your business income, excluding certain things like GST and sales to associates. If a business exceeds the turnover, it must register within 21 days or face paying GST retroactively, plus penalties. Note, to determine your current GST turnover, look at your turnover for the current month plus the previous 11 months. To determine your projected turnover, look at the current month plus the next 11 months.
Voluntary GST Registration
If you don’t have to register, should you? Consider these pros and cons for your business:
Pros
Claiming back GST on business expenses.
Increased business credibility – being registered could make your business look more professional.
Some suppliers prefer to deal with GST-registered businesses.
If you are an exporter/importer, being GST-registered can make things easier.
Cons
More paperwork and administration.
Potentially extra costs if you choose to use an external tax professional to prepare and lodge your business activity statements (BAS).
Prices might seem higher to non-GST registered customers so they may avoid buying from you.
Cash flow can be tricky, especially when it comes to setting aside the GST collected from sales. It’s crucial to resist the temptation to use those funds before your BAS is due.
GST-registered businesses may be at increased risk for ATO audits.
Key takeaway: GST registration is mandatory in certain situations. If it’s optional, weigh the pros and cons carefully based on your business needs. If a business does choose to register, generally it must stay registered for at least 12 months.
How to register for GST
If you decide to register for GST or are required to do so, you can do this when you apply for an ABN (Australian Business Number). Note, you must have an ABN before you can apply for GST registration. To set this up go the Australian Business Register website.
If your business is up and running and you want to add GST registration to your ABN, go to the Business Registration Register, or Online Services for Business (OSFB). Alternatively, you can ask your tax professional to register your business for GST on your behalf.
Recently, I have seen some new software players in the accounting software space. These developers have created software just for sole traders, freelancers and the self-employed. I think this is a great idea as some accounting software can be very overwhelming and complicated and contain many functions that sole operators just don’t require. This week I am reviewing 2 of these new software: Solo by MYOB and Sole.
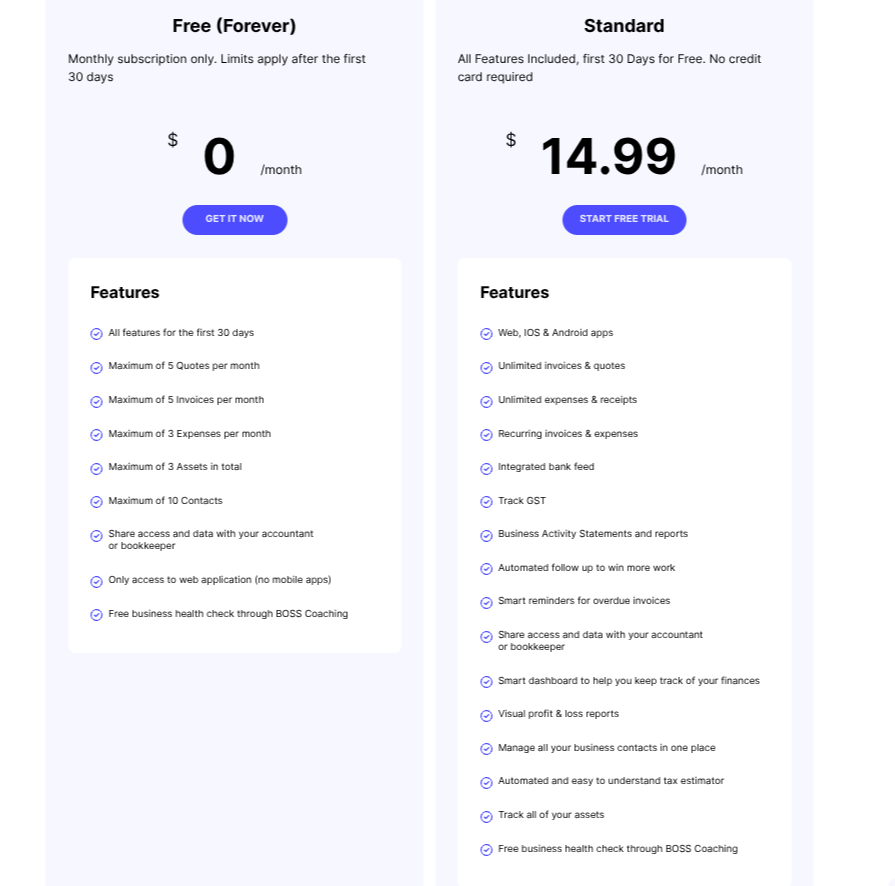
Sole is an Australian accounting software that offers GST tracking, expense categorisation, invoicing, quotes, bank feeds customer reminders, tax reporting tools and financial reporting. There is both a web and mobile app. The user can invite their tax professional to connect to the file if required. The cost is reasonable as can be seen below. There is also a free forever option, however the features are somewhat limited. Sole does not offer payroll but has partnered with Clockon to assist with Single Touch Payroll reporting. Sole is not suitable if your business has advanced inventory management needs, relies heavily on external CRM systems or requires integration with several other platforms.
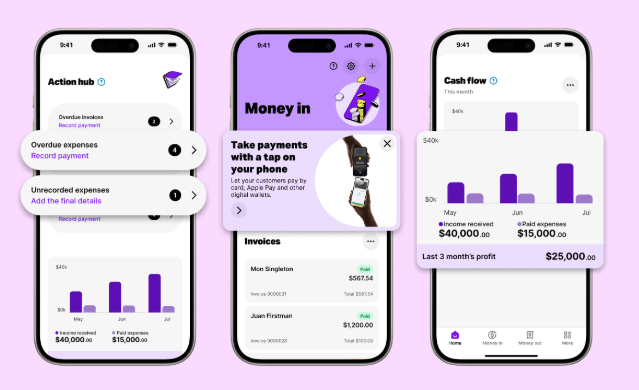
Solo is an MYOB product which launched in November 2024. It is a mobile app only, that is, it isn’t available on the web. Solo does not include payroll or inventory management. At the time of writing this blog, users cannot invite their tax professionals into the Sole file, however, reports can be downloaded and provided to bookkeepers etc. Solo is an app available on IOS and Android and offers expense tracking, record-keeping, tax and GST tracking, invoicing and in-person “Tap to Pay” payments, income snapshot reports and bank feeds. MYOB reports that more features will become available during 2025. The current price for Solo is $12 for 12 months and then $99 per year following the first year.
These two software tools could be very helpful for “solopreneurs”, especially startups. Any product that helps business owners get organized, manage record-keeping, and assist with reporting is valuable. While these tools are quite basic in functionality, they are a good starting point and help users understand bookkeeping and tax requirements. I believe these software tools will become very popular, and I’m sure more similar products will follow in their footsteps soon.
In our last blog, we covered whether or not a side hustle like selling items on eBay or being an influencer could be a business and how to tell when a side hustle turns from being hobby-like activity to a business activity. We looked at a list of questions the ATO may ask to help you determine your answer and we quoted the ATO’s definition of what constitutes a business:
“Typically, a business involves a series of continuous and repeated activities that you undertakewith the intention of generating a profit.Profit can take the form of money, but it can also be earned through other means, such as receiving goods or services (such as a barter deal). A one-time transaction may also qualify as a business if it is either:
intended to be repeated
the first step in starting a business.
You can operate one or multiple businesses simultaneously.“
So, given that you may have reviewed your situation and have ascertained that your side hustle is indeed a business, what do you need to do next?
There are several steps you need to take when beginning a business. These are listed below:
Make sure you have a tax file number.
Visit your accountant and ask for help regarding the best structure under which to operate your business. This may be a sole trader, company, trust or partnership or some variation of these structure types.
Register for GST if your GST turnover is or will be, $75,000 over the next 12 months. This can include products or services you’ve received instead of money. Note, if your side hustle is ride-sourcing, you need to register for GST from the day you start, regardless of how much you earn.
Register your business name. This can be done on the ASIC website.
Following on from #5, you will also need to get work cover insurance for your staff. This is state-based so you will need to access this information via your state’s workcover website.
If you intend to pay income tax instalments, register for Pay as you go instalments. You can do this voluntarily or wait for the ATO to tell you when you need to pay instalments.
Depending on the type of business you are running, you may also need to register for Fringe Benefits Tax, Fuel Tax Credits, Wine Equalisation Tax and/or Luxury Car Tax.
Again, depending on your industry, you may need specific state-based licences and council permits. Check with your small business department to find out what you may require.
If you’ve become a director of your company, then obtain a Director ID. Again, your accountant can help you decide if a company structure is appropriate for you.
These are just the basics when starting a new business. There is more to know and do. The best place to start is with your accountant or tax agent. He/she will help guide you through some of these tasks and may even do them for you. Another good place to start is the ATO website – they have a lot of great information to assist you when you are starting a business. Here is their “Before you start a Business” web page. It has loads of useful tips. The ATO also has a series of free courses you can access for new and established businesses – see here.