Search
Close this search box.

Why has my PAYG Withholding Cycle Changed?

If you’re an employer, your PAYG withholding (PAYGWH) cycle might change depending on how much you withheld in the prior financial year. The ATO will advise you about this change in April each year via a written letter. The cycle change will occur on 1 July of the next financial year.
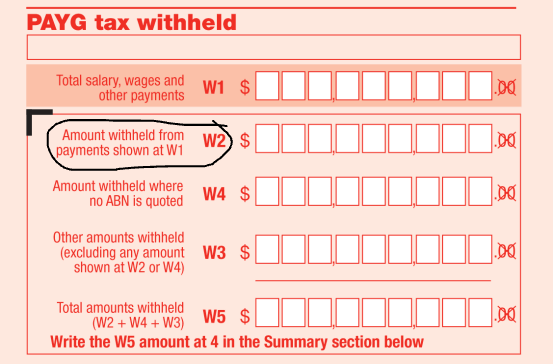
As a small withholder (small employer) you pay PAYGWH with GST and other taxes in your quarterly BAS. But, the ATO can switch your PAYGWH to monthly if, in the last financial year,

you withheld $25,001 to $1,000,000 from employee wages

These employers are called “medium withholders”.

If that’s you, you must lodge and pay a monthly Instalment Activity Statement (IAS) by the 21st of each month. For example, PAYGWH for July is due by August 21st.

If you withheld over $1 million last financial year, you’re a “large withholder”

Large employers have specific dates to pay PAYGWH and get special payment reference numbers (PRN). The ATO will provide you with these details. Remember, large withholders don’t report PAYGWH on their activity statement, but they should still match up their reported STP and paid amounts.

If the ATO changes your PAYGWH cycle, update your payroll software to meet the new deadlines.

If you think your PAYGWH for the next financial year will be below the thresholds mentioned above, you can ask to stay on your current PAYGWH cycle. You must do this within 14 days after getting the ATO’s letter about the cycle change. Complete this form and send it to the ATO (or your tax agent can help).

For more info, check out the ATO Annual Review of PAYG Withholding Cycles on the ATO website.

Like it? Share it!

Why has my PAYG Withholding Cycle Changed? Read More »
Client Agent Linking – Useful Links, Videos & Phone Numbers

In a previous blog, I discussed the challenges agents and clients face because of Client Agent Linking (CAL). Many of the issues encountered are related to setting up various digital identity software and/or not understanding the CAL process. In this blog, I will share useful links, videos and phone numbers to help those stumbling through this difficult task! 

As mentioned, the CAL process is complicated. It involves setting up a myGovID, linking the ABN to the myGovID in Relationship Authorisation Manager (RAM), logging into Online Services for Business (OSB), nominating a new agent and finally advising the agent that the nomination has occurred. The links to assist with setting up myGovID, RAM and OSB are below, along with a step-by-step guide to CAL both in written and video format. Some phone numbers are listed for those who prefer to call a human being! I hope this helps those who are struggling with CAL.

  1. How to nominate an agent in online services for business (download)
  2. The agent nomination process explained
  3. Troubleshooting guide for agents
  4. How to set up myGovID
  5. Online services for businesses
  6. Relationship Authorisation Manager (RAM)
  7. Link your myGovID to your ABN
  8. For agents – think before you link!

CAL – Useful Phone Numbers

  1. ATO – help with nominating an agent or with online services for business – 132866
  2. ATO – help with late lodgements and payments due to not being able to link to an agent – 1300 660 048
  3. ATO – agent can’t link a new client in online services due to a system error – 137286 (only call if the client has completed the nomination process)
  4. RAM – 1300 287 539 (select option 3 for RAM enquiries)
  5. myGovID – 1300 287 539 (select option 2, then option 1 for myGovID enquiries).

CAL – Useful Videos

ATO Client-To-Agent Linking Steps: How to nominate an agent in Online Services for Business

Client / Agent Linking – An ATO How-To Tutorial

Like it? Share it!

Client Agent Linking – Useful Links, Videos & Phone Numbers Read More »

Wage Theft Legislation is Coming! Review your Payroll Now!


On 1 January 2025, Wage Theft Legislation will be enacted. This legislation is part of the Federal Government’s “Closing Loopholes” laws which effectively change the Fair Work Act.

Wage Theft Legislation will make it a criminal offence to underpay wages deliberately. Penalties could be $7.825 million or more for a company and $1.565 million or more for an individual and/or 10 years in prison. The Fair Work Ombudsman will be responsible for investigating possible wage theft cases.

These are very hefty penalties indeed. No one wants to be at the pointy end of these new laws therefore, in my opinion, reviewing your payroll set-up now and ensuring it is completely compliant, would be a good idea. To that end, conducting a payroll audit is necessary.

How to Audit Your Payroll Set-up

A payroll audit includes a review of payroll practices, systems and outcomes, all underpinned by complex regulations that vary at the federal, state and territory levels. It looks at employee classifications, pay rates, entitlements, and record-keeping.

The Fair Work Ombudsman has provided a step-by-step guide to auditing your payroll. You can download it here. The guide assists in reviewing payroll records, assessing the findings and finally, providing solutions for any issues raised.

Further to the above guide, the Australian Payroll Association recommends taking these 5 steps to assist with the audit process:

  1. Engage a Specialist – a payroll specialist can review your current set-up and identify any gaps or areas of risk that require addressing.
  2. Educate your Team – make sure your team is across the new Wage Theft Legislation. Provide training and education in any areas of payroll legislation in which your team are lacking.
  3. Leverage Technology – Modern payroll systems help avoid non-compliance issues. If your payroll technology is outdated or not up to par with Australian requirements, consider upgrading to a system that automates calculations and processes for better compliance.
  4. Document Everything – Ensure all payroll processes are well-documented and records are meticulously kept to prove compliance, aid transparency, and defend your organisation in disputes.
  5. Regular Reviews – Once your payroll is fully compliant, ensure regular payroll audits are conducted to catch and correct any discrepancies before they create significant issues.

With the introduction of Wage Theft Legislation, employers are encouraged to be proactive and conduct a thorough payroll audit to ensure compliance. Doing this now, and making it a regular process going forward, will ensure that employers are well-placed to avoid becoming embroiled in criminal proceedings and potential sanctions.

    Like it? Share it!

    Wage Theft Legislation is Coming! Review your Payroll Now! Read More »

    Client Agent Linking – Issues & Challenges

    Client Agent Linking (CAL) has been in action since 13 November 2023. CAL was created to reduce identity-related fraud attempts, including criminals taking over agents’ identities. CAL ensures that a client has authorised an agent to access his/her tax records. Before CAL, all an agent had to do was enter a client’s ABN into their Online Services for Agents portal to connect himself to the client. This connection method has become very unsafe since ABN data is easily attainable on the ABN Lookup site. This has meant that criminals could easily create a scenario where clients’ data is compromised and misused.

    No one disputes that creating a process whereby clients’ data is kept secure and criminal activity is kept to a minimum, is warranted. As cybercrime increases, the more we can use technology to help us fight the war, the better! CAL is part of this technology arsenal, however, since its live delivery, both agents and clients alike are finding that from a practical perspective, CAL is less than perfect! Many issues and challenges have arisen as a result of CAL. Some of these are described below.

    Issues and Challenges for Clients

    • CAL requires the set up of myGovID and Relationship Authorisation Manager (RAM). Some clients find setting this up difficult and even harder to access help from the ATO.
    • The process is quite complicated. It involves setting up a myGovID, linking the ABN to the myGovID in RAM, logging into Online Services for Business (OSB), nominating a new agent and finally advising the agent that the nomination has occurred.
    • The above process is made more difficult if a financial structure is complicated e.g. involves trusts, self-managed super funds etc
    • CAL requires some level of technological expertise and experience which is not available to all clients.
    • Setting up a myGovID requires strong identification proof which includes a passport. Not everyone has a passport and applying for one is difficult, time-consuming and expensive. Currently, there isn’t any process available to clients who do not have a passport.
    • For CAL to work, a client’s Australian Business Register (ABR) must be current and up to date. A client must access his/her ABR and update the details before beginning the CAL process. This means more time and more frustration.
    • Setting up CAL must be done by the client only. Agents cannot assist the client for security reasons. If a client is not tech-savvy or doesn’t understand the steps required, not being able to ask their agent for help is an issue!
    • Clients can ring the ATO for assistance in setting up CAL, however, this can be very time-consuming.
    • If a client cannot complete the CAL, he/she won’t be able to use an agent for tax lodgements. If this occurs, lodgements will be late and tax payments will be on hold. As a result, such clients may face penalties from the ATO (even though this situation isn’t their fault!). Clients will be forced to process their lodgements via OSB themselves. Of course, some clients are capable of self-lodgement, however, the more complex their tax situation, the less likely they will want to attempt lodgements without some advice and assistance for fear of making errors etc. These are the clients who will fall through the cracks!
    • If a client wants to change from one agent to another but cannot action CAL successfully, the client will be forced to remain with the original agent. This isn’t ideal if the client/agent relationship has broken down.

    Issues and Challenges for Agents

    • A major issue for BAS agents is losing access to current clients in Online Services for Agents (OSFA). This occurs when a tax agent uses the wrong identifier when setting up a new client for income tax lodgements. The correct identifier is the tax file number but many tax agents enter the client’s ABN instead. When an ABN is chosen, this instantly removes the BAS agent’s access to the client. This is frustrating for both the BAS agent and the client because to link to the client again, the client has to go through the CAL process even if the BAS agent and the client may have been engaged for many years! I have been told anecdotally that this is also happening between BAS agents. For example, if one BAS agent is responsible for payroll and another for BAS lodgement, each time payroll is lodged via STP or a BAS is lodged, each agent removes the other from OSFA – crazy stuff! As you can imagine, this is very frustrating for clients but can also create friction between agents. The whole tax landscape is on a slippery slope due to CAL!
    • Following the above issue, if a tax agent uses the ABN as the identifier in OSFA for a new client, s/he will not see the option to add the income tax account for that client. In this case, the tax agent must ask the new client to perform the CAL process again. As you can imagine, this will be very frustrating for the new client – not a great way to begin the client-agent relationship! Tax agents need to understand that using the TFN identifier provides them access to all client accounts i.e. income tax, FBT and ICA (BAS).
    • BAS agents are losing clients to tax agents as a result of CAL. The complexity of CAL for some clients is forcing them to remain with a tax agent to lodge all tax liabilities even if they would like to engage a BAS agent to assist them with BAS, bookkeeping and payroll. Clients can’t be bothered to go through the CAL process for every agent so they are taking the easy way out and asking their tax agents to do the lot!
    • Some agents find that CAL is taking too much of their time (for which most are not charging). Even though agents cannot assist clients with CAL, clients are asking for help nonetheless. Until the CAL process is improved, many agents have decided against engaging new clients.
    • All agents, BAS or tax are losing work because potential and current clients find CAL too complex and time-consuming. Some clients are avoiding navigating the CAL process and are instead choosing to go it alone. This is not ideal for agents wishing to build their client base or for clients who need tax assistance and advice (which is most of them!).
    • When a client successfully links to a new agent, the client must contact the agent to advise him/her. From there, the agent can accept the new client in OSFA. If, however, the client does not advise the agent or the agent doesn’t receive/read the message in the current time frame (currently 28 days), then the CAL is reset and the whole process will have to begin again. A better notification system is required here.

    As you can see, many issues and challenges are being met by agents and clients due to CAL. This situation has occurred because CAL was not fully tested at the time of its release. I believe more testing, research and education should have been carried out before going live. While it works on the whole, for those clients with complex tax needs or who are technology-challenged, CAL is too hard! Until these issues are resolved, I believe CAL should be removed. If this does not happen, agents will lose work, clients’ lodgements and payments will stop and the tax industry as a whole may implode! Hopefully, the ATO will review their decision to continue to implement CAL without first resolving these issues.

    Like it? Share it!

    Client Agent Linking – Issues & Challenges Read More »

    Client Agent Linking in Online Services


    What is Client Agent Linking?

    Client Agent Linking is an ATO initiative intended to improve security over client identity and limit OSFA (Online Services for Agents) fraud by agents, their employees, and other authorised persons. From November 13, 2023, if you want to engage a new BAS or Tax agent to act on your behalf, you will need to nominate them in your Online Services for Business. This is known as “Client-Agent Linking”.

    Why is Secure Client Agent Linking Important?

    The intended outcome of this new process is to reduce fraud and identity theft and improve data security. By strengthening the security of this process, all parties involved – including you, your agent, and the ATO, can have confidence that you, the client, and not a fraudulent person, have authorised an agent to act on your behalf. 

    Rollout of Client Agent Linking Process

    The ATO has implemented a phased rollout of the client-to-agent linking process. The following businesses and organisations are currently included in the rollout or will be soon:

    1. Public and multinational businesses who are part of the Top 100 and Top 1,000 – effective from 19 June 2022.
    2. Most public and multinational businesses – effective from 13 December 2022.
    3. Businesses in the Top 500 privately-owned wealthy groups, where that group has a significant level of ownership of the business – effective from 13 December 2022.
    4. Government entities – effective from 24 February 2023.
    5. All types of entities with an Australian Business Number (ABN) excluding sole traders – effective from 13 November 2023.

    Please note that the client-to-agent linking process does not currently apply to individual taxpayers. However, from 13 November 2023, it will apply to all types of entities with an ABN, excluding sole traders.

    Nominating a New Agent

    When you intend to do either of the following, you need to nominate or link the agent. 

    1. Engage a new tax or BAS agent, or payroll service provider to represent you.
    2. Provide extra authorisation to your existing authorised agent, such as representing you for a new obligation like activity statements or a new entity in your group.

    You can do this by using the new agent nomination feature in Online Services for Business (see the steps below).

    Once you complete the agent nomination, you must let your agent know that you have nominated them as he/she will not receive any notification from the ATO. The agent will have 28 calendar days to add you to his/her client list in Online Services for Agents or Practice Software.

    Steps to Nominate a New Agent

    1. From the Online Services for Business home page:
    2. Select Profile, then Agent details at the Agent nominations feature, and select Add
    3. On the Nominate agent screen, go to Search for an agent
    4. Type your agent’s (or payroll service provider’s) registered agent number (RAN) or practice name and select Search
    5. Select the agent you want to nominate (if multiple results are returned, select the correct agent)
    6. Check that the agent’s details are correct
    7. Complete the declaration by selecting Submit. You’ll now see your agent’s details listed under Agent Nominations.
    8. Let your agent know that you have nominated them!
    1. How to nominate an agent in online services for business (download)
    2. The agent nomination process explained
    3. Troubleshooting guide for agents
    4. How to set up myGovID
    5. Online services for businesses
    6. Relationship Authorisation Manager (RAM)
    7. Link your myGovID to your ABN
    8. For agents – think before you link!

    Conclusion

    The Client-to-Agent linking process strengthens security measures for you and your business, agents, and the ATO. It not only protects your business but also safeguards your sensitive information from fraudulent attempts and uses in identity theft. By following the steps to link to a new agent, you can embrace a more secure digital landscape for your business and your agent/s.

    Like it? Share it!

    Client Agent Linking in Online Services Read More »

    Which of the Three Fair Work Information Statements do you need to give to your employees? One or all three?

    Once upon a time, there was only one Fair Work Information Statement (FWIS). But now there are three of them! As an employer, you need to know which one to give to your employees. This could be only one depending on your employment situation, or all three. But before we look at the three statements, let’s quickly revisit the background of the FWIS for those who may not be across it.

    The FWIS provides information to new employees about the conditions of their employment, including details about the National Employment Standards. The FWIS must be given to new employees before or as soon as they begin working for you.

    3 Fair Work Statements

    As mentioned above, there are now three statements. Let’s look at each one separately.

    1. The Fair Work Information Statement. This is the most well-known statement as it has been around for some time now. The FWIS has information on:

    • the National Employment Standards
    • right to request flexible working arrangements
    • modern awards
    • making agreements under the Fair Work Act 2009
    • individual flexibility arrangements
    • freedom of association and workplace rights (general protections)
    • termination of employment
    • right of entry
    • the role of the Fair Work Ombudsman and the Fair Work Commission.

    2. The Casual Employment Information Statement. The CEIS has information about:

    • the definition of a casual employee
    • when an employer has to offer casual conversion
    • when an employer doesn’t have to offer casual conversion
    • when a casual employee can request casual conversion
    • casual conversion entitlements of casual employees employed by small business employers
    • the role of the Fair Work Commission is to deal with disputes about casual conversion.

    Employers aren’t required to give casual employees the CEIS more than once in any given 12-month period (for example, if an employer employs a casual employee temporarily at different stages in one 12-month period, they only need to give them the CEIS once. However, it should be noted that large employers (15 or more employees) must give the CEIS to employees every 6 months. Still, small employers (15 or fewer employees) must provide the CEIS every 12 months on the anniversary of each employee’s start date.

    3. The Fixed Term Contract Information Statement. The FTCIS has information about:

    • what a fixed-term contract is
    • limitations on the use of fixed-term contracts
    • exceptions to the limitations
    • how to resolve disputes about fixed-term contract limitations and exceptions.

    How to Give these Statements to your Employees

    Fair Work states that you may provide these statements in a variety of ways:

    • in person
    • by mail
    • by email
    • by emailing a link to this page of their website
    • by emailing a link to a copy of the FWIS available on the employer’s intranet

    Depending on the employment status of your employees, you may need to provide the FWIS only. However, if you employ a mix of employees i.e. full-time, part-time, casual, and/or fixed-term contract, it may be necessary to provide all three statements as described above. Remember, providing the FWISs is not optional – it is compulsory. Failure to do so may incur penalties – see here.

    Like it? Share it!

    Which of the Three Fair Work Information Statements do you need to give to your employees? One or all three? Read More »

    How to Series No 4 – How to Account for Hire Purchases

    This is the fourth part in a series I’m calling “How-To”. The first part was about insurance bills, the second part was about VicRoads registration bills and the third part was about chattel mortgages. I will be using Xero for the example, but don’t worry if you use another software, the basic rules will still apply. 

    The fourth how-to is about how to account for hire purchases in your accounting software. A hire purchase arrangement is an agreement to purchase goods in instalments.

    Step 1

    Let’s pretend that your business has purchased a new printer with all the bells and whistles for $15K via a hire purchase agreement, plus $5,000 interest.  For this example, the hire purchase is for 30 months without a residual (balloon) payment at the end of the period. Note, that most hire purchase agreements will include a balloon component (check your documentation). The first thing to do is collect all of the documentation. You will need the hire purchase agreement, the invoice, and the interest amortisation schedule. The hire purchase company will provide all of this to you at the point of purchase. To begin the process, create some accounts in your accounting software:

    • Office Equipment (Asset GST Inc)
    • Hire Purchase Unexpired Interest (Liability GST Inc)
    • Hire Purchase Liability (Liability BAS Excluded)
    • Interest Expense – Hire Purchase (Expense BAS Excluded)

    Note, For any Hire Purchase Agreement made after 1/7/2012, both the purchase price of the asset and all interest charges and fees are subject to GST. (see notes at the end of the blog)

    Step 2

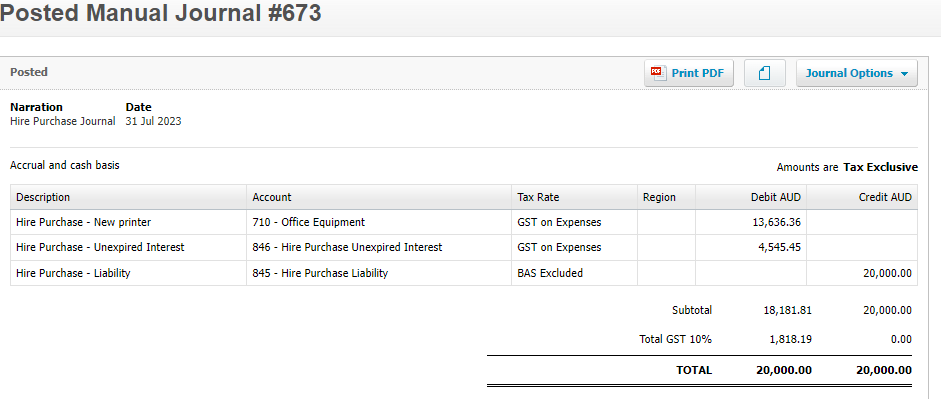
    Now you can enter this journal which adds the purchase of the printer into the accounts:

    Check your balance sheet. It should look like this:

    Step 3

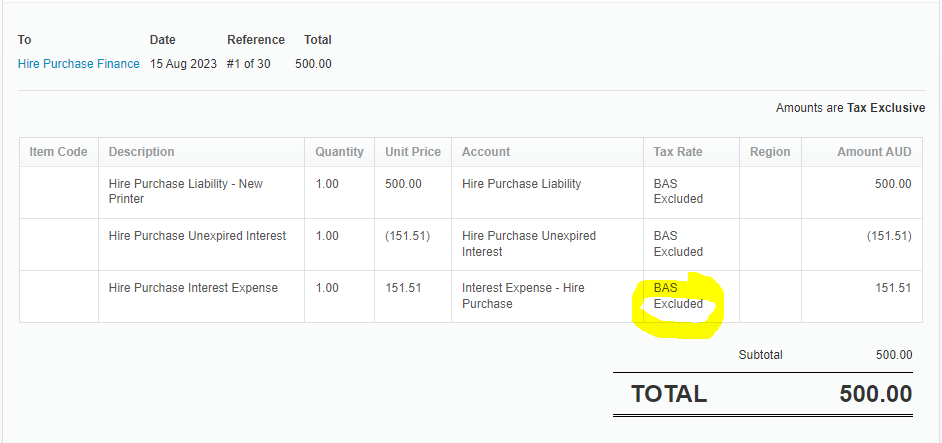
    When it comes time to record the first repayment to the finance company, your entry will look like this (assuming each repayment is $500 (30 x $500 = $15K)). Note, that the tax code for the interest expense account is BAS Excluded. This is because the GST on the interest component of the hire purchase was claimed when the purchase was entered initially (see journal). Therefore the monthly repayments of interest are not reportable on the BAS.

    Step 4

    Check that the balances in the balance sheet are reduced by the first repayment – see below. Note that I have evenly split the interest repayments into amounts of $151.51 for this example ($4,545.45 divided by 30 payments). However, you will need to enter the interest amounts as per your amortisation schedule and these won’t be exactly the figures divisible by the number of repayments. Something to keep in mind!

    GST rules for hire purchases

    For hire purchase agreements entered into on or after 1 July 2012, all components of the transaction are subject to GST including:
    • The upfront purchase price of the asset financed under the agreement
    • Interest charges, and
    • Any other associated fees.

    This is the case regardless of whether you account on a cash or accrual basis.

    This means that taxpayers on a cash accounting basis can claim the full amount of any available GST credit at the time the first payment is invoiced or paid under the hire purchase.

    This was the last part of our How-To series (for now). I hope you found this series useful. For further details about hire purchase agreements and GST, go to this ATO webpage.

    Like it? Share it!

    How to Series No 4 – How to Account for Hire Purchases Read More »

    How to Series No 3 – How to Enter a Chattel Mortgage Asset Purchase & Loan

    This is the third part in a series I’m calling “How-To”. The first part was about entering insurance bills and the second part was about how to enter a VicRoads registration bill. I will be using Xero to present the example, but don’t worry if you use another software, the basic rules will still apply. 

    The third how-to is about how to enter a Chattel Mortgage asset and associated loan into your accounting software.

    Step 1

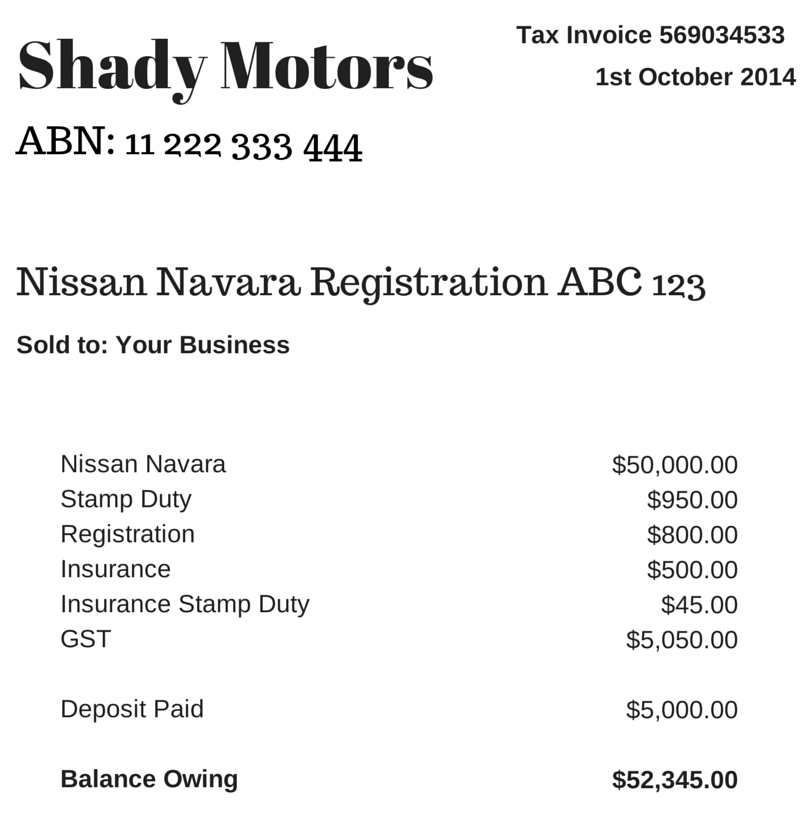
    Let’s say your business has purchased a new motor vehicle. The invoice from the vehicle dealer might look something like the below example. Grab your invoice now.

    Step 2

    The finance company loan schedule is also required. It may look something like the below example. Grab you loan schedule now.

    Step 3

    Create the following accounts in your software (check first because some may already exist):

    • Deposit Paid (Current Asset) – no tax code
    • Motor Vehicles at Cost (Non-Current Asset) – apply capital expense including GST tax code
    • Chattel Mortgage (Motor Vehicle) (Non-Current Liability) – no tax code
    • Chattel Mortgage Interest Charges (Expense) – no tax code
    • Chattel Mortgage Fees & Charges – tax code varies, could be Free or GST inclusive (check your documentation)
    • Motor Vehicle Registration (Expense) – apply GST Free tax code
    • Motor Vehicle Insurance (Expense) – apply GST inclusive tax code
    • Unexpired Term Interest (Non-Current Liability) – no tax code

    Step 4

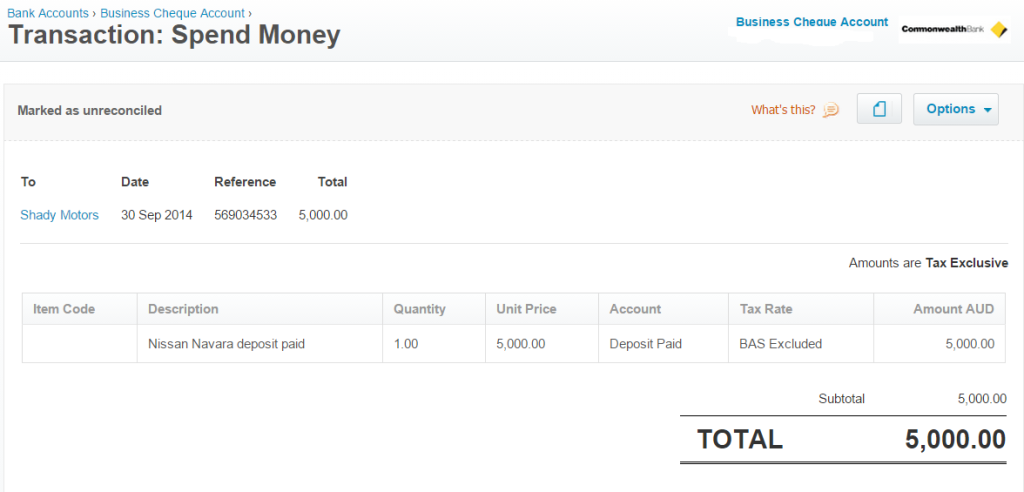
    First enter a spend money transaction to record the payment of the deposit:

    Step 5

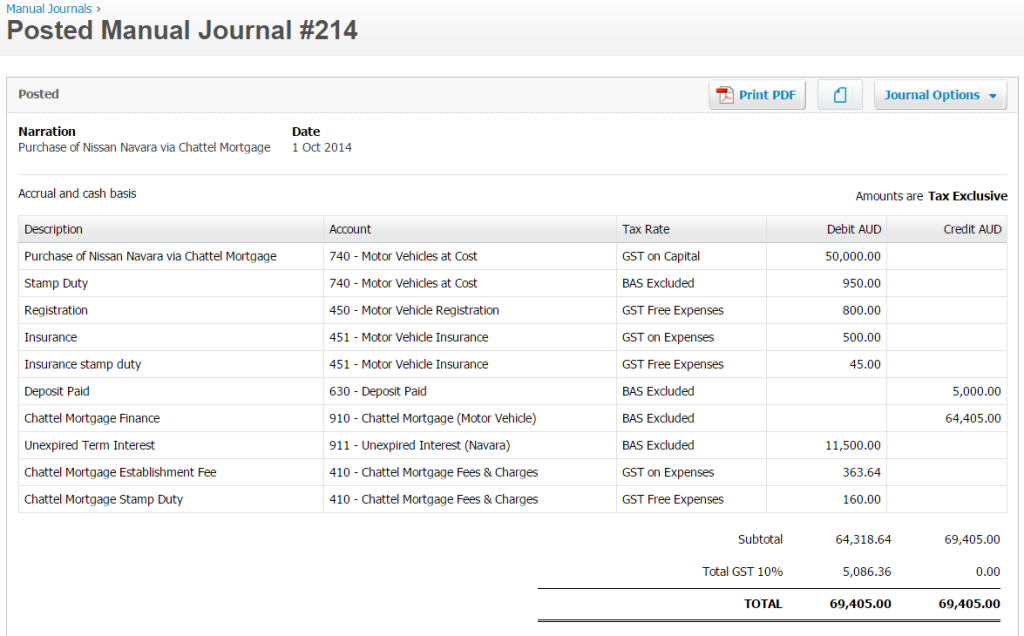
    Next, enter this journal to record the purchase of the new vehicle:

    Step 6

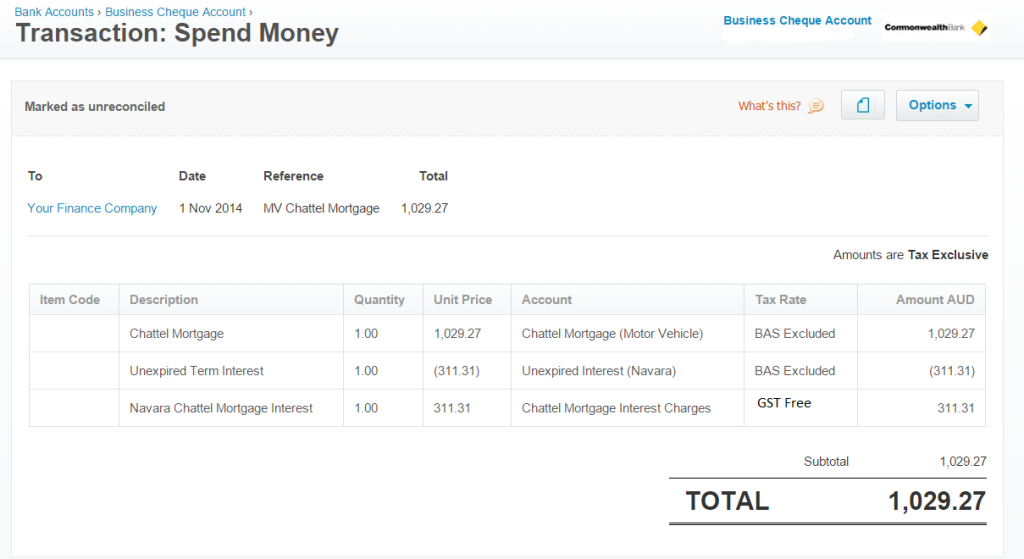
    When it comes time to make a repayment to the finance company, enter a spend money transaction like this:

    Bonus Tip!

    Sometimes it isn’t possible to obtain the loan repayment schedule for whatever reason. When this happens, you need to create your own. I use this amortisation calculator by Bret Whissel. It has served me well over the years. I hope you find it useful too.

    Next week for part four of this How-To series, I will cover how to set up a Hire Purchase agreement in your accounts. Until then, happy bookkeeping!

    Like it? Share it!

    How to Series No 3 – How to Enter a Chattel Mortgage Asset Purchase & Loan Read More »

    How to Series No 2 – How to Enter VicRoads Registration Bills

    Last week, I started a bookkeeping resource series called “How To”. Each week I will share instructions with you about how to enter some common transactions. I will be using Xero to present the example, but don’t worry if you use another software, the basic rules will still apply. Last week I explained how to enter an insurance bill.

    The second how-to is about how to enter a VicRoads registration expense/bill into your accounts.

    Step 1

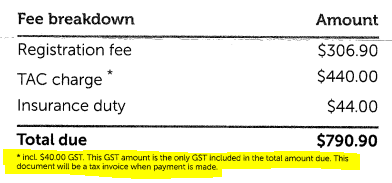
    Grab your VicRoads bill and go to the part where it shows you the breakdown of charges. It may look something like this:

    Step 2

    Log into your software and go to the area where you enter bills.

    Step 3

    Enter the VicRoads as the supplier, the relevant dates and the reference number or name as below:

    Step 4

    Enter a line in the bill for each charge shown on the bill. The registration fee is GST-free, the TAC charge includes GST and the insurance duty is BAS Excluded. If you are entitled to claim 100% of motor vehicle costs in your business, then you can claim the full GST amount on the TAC charge. Time and time again, I see clients entering the full amount of the registration expense as GST-free. While they are partly right, they are also missing out on claiming the GST of the TAC charge. Also, relevant here is the choice of account for expense coding – you may like a general account such as this one “Motor Vehicle Expenses”, or you may like to split your costs out in a more detailed manner and have an account for each type of car expense, in this case, “Motor Vehicle Registration”. It just depends on how much detail you want to see in your profit and loss report.

    Step 5

    Check that the GST amount agrees with the VicRoads bill. In this case, it is $40.00.

    Step 6

    Approve the bill to ensure the expense is added to the accounts correctly.

    Final words…

    So that’s it for this week’s “how-to”. I hope you learned something new. One thing I’d like to add about VicRoads “bills” before I close off this blog, is that to obtain an actual bill, you do have to have an account with VicRoads. They used to send out the document in the mail, but not anymore – it’s all online, like everything these days. Here’s the link to VicRoads where you can make an account if you haven’t already done so.

    Bonus Tip!

    For any bookkeepers out there who know the pain of not ever receiving an actual VicRoads bill from clients (who probably don’t know how to get it – see notes above), which makes data entry nearly impossible, here is the link to the TAC registration rates for FY24. This document provides the breakdown of TAC and insurance duty fees based on postcode and vehicle type. An excellent resource that I am sure you will use time and time again. There is also an online calculator you can use on the VicRoads website that will provide the figures you need easily. Here is the link for the calculator. Either resource will get you the information you need. You’re welcome by the way!

    Next week I will show you how to enter a chattel mortgage loan. Until then, have a happy week.

    Like it? Share it!

    How to Series No 2 – How to Enter VicRoads Registration Bills Read More »

    How to Series No 1 – How to Enter an Insurance Bill

    This week, I am starting a bookkeeping resource series called “How To” (not very original, I know!). Each week I will share instructions with you about how to enter some common transactions. I will be using Xero to present the example, but don’t worry if you use another software, the basic rules will still apply.

    So here goes, the first how-to is about how to enter an insurance bill into your accounts the right way.

    Step 1

    Grab your insurance bill and go to the part where it shows you the breakdown of charges. It may look something like this:

    Step 2

    Enter a line in the bill for each charge shown on the bill. In this case, there is one for the premium and one for the stamp duty component. Select the insurance account you want to use – you may have one for business insurance and another for motor vehicle insurance etc. Notice that the premium figure is plus GST, whereas the stamp duty is BAS excluded. This is because stamp duty does not attract GST. It is very important to break up your insurance bill like this and to never enter a bill 100% inclusive of GST. Doing so will mean that you overclaim GST in your BAS.

    Step 3

    Check that the GST amount agrees with the insurance bill. In this case, it is $38.25 which is one cent less than our bill, hence the rounding line I have added to agree the total amount with the supplier’s bill.

    Step 4

    Approve the bill to ensure the expense is added to the accounts correctly.

    Final Words…

    So that’s it for this week’s “how-to”. I hope you learned something new. Please note that this insurance example is pretty basic. Some insurance bills have extra charges which may or may not include GST. The trick to getting these sorts of more complex bills entered correctly is to ensure the GST figure in the bill agrees with your software entry. If it doesn’t, you need to check each charge for its GST status i.e. some items will include GST and others may be GST-free or GST-exempt.

    Next week I will show you how to enter motor vehicle registration bills. Until then, have a happy week.

    Like it? Share it!

    How to Series No 1 – How to Enter an Insurance Bill Read More »

    Scroll to Top