Search
Close this search box.

Useful Apps

10 Ways Bookkeepers Can Use ChatGPT

Unless you’ve been living under a rock, you would undoubtedly have heard the term artificial intelligence or “AI”. AI is the new buzzword and seems to be everywhere you look. In particular, most accounting software, and many other apps have embraced AI and have made it a part of their interface.

While some may be dubious about AI (even afraid), the fact is, that it is here to stay and has been a part of the way we use technology for a long time. Google apps including Gmail and GDrive, apps like “Grammarly” and other apps that make suggestions as you type, for example, are all using AI to enhance the user experience and basically make life easier. 

Given AI is already here and we use it daily (even though we may not be aware of it), I have started to wonder how bookkeepers can use it to assist with daily tasks. To that end, I have done some research into how we can use ChatGPT for this purpose.

What is ChatGPT?

ChatGPT stands for Chat Generative Pre-training Transformer. It was launched in November 2022 and is a remarkable text-based chatbot. It enables users to effortlessly type queries and receive accurate answers, as well as efficiently complete tedious tasks. This advanced chatbot is trained with extensive data, allowing it to generate responses that closely resemble human-like interactions. You can download the ChatGPT apps from your favourite app store.

So now that we know what it is, how can bookkeepers use ChatGPT? There are actually many ways to use it, but here are 10 ideas to get you started. 

    1. Writing those “difficult” emails to clients. Sometimes as bookkeepers, we need to tell our clients they have to go, or we are putting our prices up or we found something dodgy in their accounts, etc. Ask ChatGPT to write the email for you by telling it what the email is about. You will receive a professionally written email script in seconds.
    2. Creating Excel formulas. Tell ChatGPT what you want to calculate in a cell or column and provide the data to work with and it will create the formula for you. Here is an example of how this might work.
    3. Creating journal entries. ChatGPT can extract information from receipts, such as dates, seller names, and amounts. Just provide the dataset, and ChatGPT will analyze it and input the client information for you. More specifically, the prompt you would use would be: “Use the following transaction details (add transaction text) and amount to create a journal using these account names (Add accounts) using (Add accounting system)”
    4. Creating checklists and subtasks. Ask ChatGPT to create a list of steps to complete any bookkeeping process. The result can be modified to suit your needs and business. You can also ask it to create subtasks for each of the steps inside a checklist.
    5. Creating client questionnaires. Ask ChatGPT to suggest a list of questions to ask new clients during client onboarding.
    6. Creating client onboarding checklists. Ask ChatGPT to create a checklist for you when onboarding a new client. You can tell it some basic details like number of employees and business structure.
    7. Creating an engagement letter. Ask ChatGPT what to include in an engagement letter for a client with XYZ requirements. Adjust to suit your business requirements.
    8. Staff onboarding checklist and letters of offer. Ask it to create a checklist for onboarding staff either for your business or for a client. Also, ask it to create letters of offer based on the details you provide. Adjust to suit your business.
    9. Creating email templates. Make a list of the type of emails you write continuously e.g. a request for information. Ask ChatGPT to write these emails for you. Update the details to suit your business and then save them as templates.
    10. Creating copy for your blog or website. Tell ChatGPT what you want to write about e.g. ideas for your About Page. Ask it to write you the copy for this page. You can do the same thing for your blogs. Simply provide it with some basic information e.g. how GST applies to food sales in Australia, and ask it to provide you with copy for your blog. Of course, you should check the details it delivers for accuracy and currency before publishing.

    I hope these ideas, or “prompts” as they are known, give you the motivation to start to play around with ChatGPT in your bookkeeping business. Obviously, the sky is the limit regarding what you can do with ChatGPT. I’m sure once you get started, you will discover many more ways to use it in your business. If you would like to share any prompts you currently use with ChatGPT, please add them below in the comments. I’m sure other bookkeepers would love the extra motivation!

    Like it? Share it!

    10 Ways Bookkeepers Can Use ChatGPT Read More »
    Managing myGovID when devices are upgraded or added

    myGovID is an app that allows you to securely access ATO online services. It proves to the ATO that the person attempting to access a service/info is who they say they are – super important in this day and age of constant cyber attacks etc.

    Setting up the app for the first time requires quite a few steps and can be slightly complicated. Sadly, if you buy a new mobile or tablet, or wish to use your myGovID on multiple devices, you will need to set up your myGovID again and re-verify your identity. You cannot just install the app on your new device and expect it to work. Below are the steps you need to follow to solve this issue.

    How to set up myGovID on a new device

    Firstly, you need to select “reset the app” within your myGovID app’s settings.
    Then, select “I am an existing user”.
    Then, follow the prompts to:

    • enter your latest myGovID email address – this is linked to the identity documents you previously verified. Setting up with a different email address will lock your myGovID on all devices and you’ll be unable to use it.
    • re-verify your identity – ATO recommends using the identity documents you previously used.

    For security purposes, you’ll receive an email letting you know your myGovID is active on another device. You can view your myGovID setup history in your app.

    Each time you set up your myGovID, its identity strength is unique to that device. This means if you set up your myGovID on multiple devices, the identity strength will only reflect what identity documents you’ve verified on that device. For example, you could have one device with a Strong identity strength and another device with a Standard identity strength. To access a service with your myGovID, that device needs to meet the minimum identity strength required of that service. Where you’re setting up on a new device, you need to take additional steps if you transferred your app.

    Like it? Share it!

    Managing myGovID when devices are upgraded or added Read More »

    Simple Cash Flow Tool

    In this blog, I am going to share a cash flow spreadsheet that I use in my business. This is my very “simple cash flow tool”. It’s not a forecast per se (but could be made into one), rather, it’s a reality check tool for your business, that tells you exactly how much you have to spend, as opposed to how much you think you have to spend!

    We’ve all looked at our bank balance when it’s healthy and started having visions of new clothes, holidays and nights out etc. However, as business owners, we also know that we have business (and personal) costs that must be paid for before any of those enticing dollars can find their way into our pockets. Below is a list of those costs included in the spreadsheet. You may have different costs or extra ones – feel free to amend the list to suit your needs.

    • General expenses (operating costs)
    • Wages, superannuation and PAYG withholding
    • GST
    • PAYG income tax and/or previous years’ income tax repayments
    • Loans and credit card payments
    • Previous’ month/quarter BAS
    • Your own sundry spending (your drawings or director loan amounts)

    How does the spreadsheet/tool work?This tool asks you to review a prior period such as last week, fortnight, month, quarter or year. For the purposes of the tool, we call these periods your “focus periods”. Before you begin using the tool, it is a good idea to choose your focus period. Of course, you can change the period type later as needed, but to begin the process, just choose one period of interest.

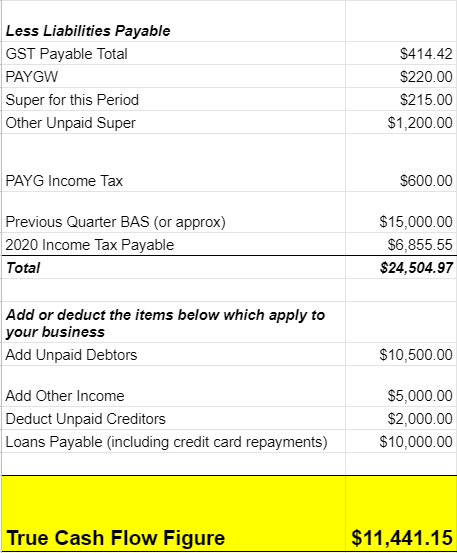
    In summary, the spreadsheet is split into two sections. The first section takes your opening bank balance at the start of your focus period, adds any income from sales, deducts your operating costs and deducts the required minimum bank balance (that amount you know you need to leave in the bank for running costs). The result provided is the balance available for spending or saving as at the end of the focus period i.e. how much you have at your disposal TODAY. Here is an example of what section one looks like – the cells highlighted in green show your available balance:

    You could decide to transfer some funds to savings, pay down debt, buy something special, give employees a bonus, buy new equipment – the choice is yours. While this information about available funds is extremely useful, our tool goes a step further!

    The second section in the spreadsheet takes today’s available balance as above, then adds back any future income and deducts future bill or liability payments.

    The final result is called your “true cash flow figure“, and is a more accurate representation of your financial position. Note the difference between the result in section one and that of section two in our example above! The true cash flow figure is less than half of the available funds as at the end of the focus period. This is often the case because section two takes all future cash transactions into account, whereas the figure in section one only looks at the here and now. Don’t get me wrong, knowing your available spending balance as of today is still necessary, however, in order to understand your true cash position, it is important to include all future spending/income. Doing this will ensure that you don’t inadvertently spend dollars that really should be saved for the long term.

    Now that you can see your “true cash flow figure” you will be able to make a more informed decision about how much is really available for spending (or saving) today. Of course, if your figure is low or even negative, then perhaps you need to review your situation and work out why this is happening. Whatever the outcome, this tool will provide you with a snapshot of your overall financial position. One important aspect to note is that for this tool to work properly, your accounts need to be up to date. As a minimum, ensure that your bank accounts are reconciled up to the end of your focus period prior to using this tool.

    I suggest running this cash flow tool on a regular basis to assist you in controlling and understanding your business finances. If you need assistance to use this tool or would like us to prepare it for you, please get in touch to discuss.

    Getting started with the cash flow tool

    Open the spreadsheet which is shared below. There are 3 tabs in the spreadsheet. The first tab of the spreadsheet is an example of how the tool works and includes notes and instructions. The second tab is a single-period cash flow to look at one focus period only e.g. one week, one month etc. The third tab is a multi-period tool that allows you to look at several periods at once. Follow the instructions provided in the first tab and then enter the figures as required into either the single or multi-period tab.

    I hope you find this spreadsheet tool useful. Let me know if you have any questions about it or have some suggestions about how to improve it, by leaving your comments below.


    Like it? Share it!

    Simple Cash Flow Tool Read More »

    New year, new process – Job Requests!

    This year we are making some changes to our internal processes. As part of those changes, we recently moved to a new job management system called Clickup. The app allows for a lot of innovation and creativity in regards to business operations, including the ability to automate many processes. We have only just begun our journey with Clickup but are already very impressed. Our first “automation creation” via Clickup is a new way for clients to send us job requests.

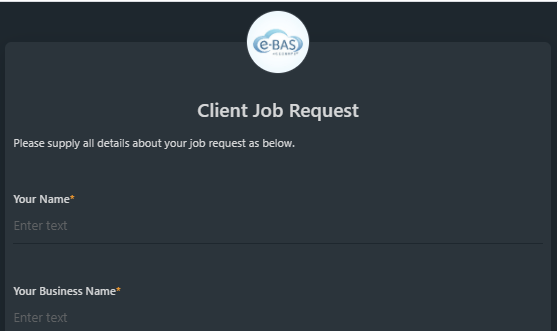
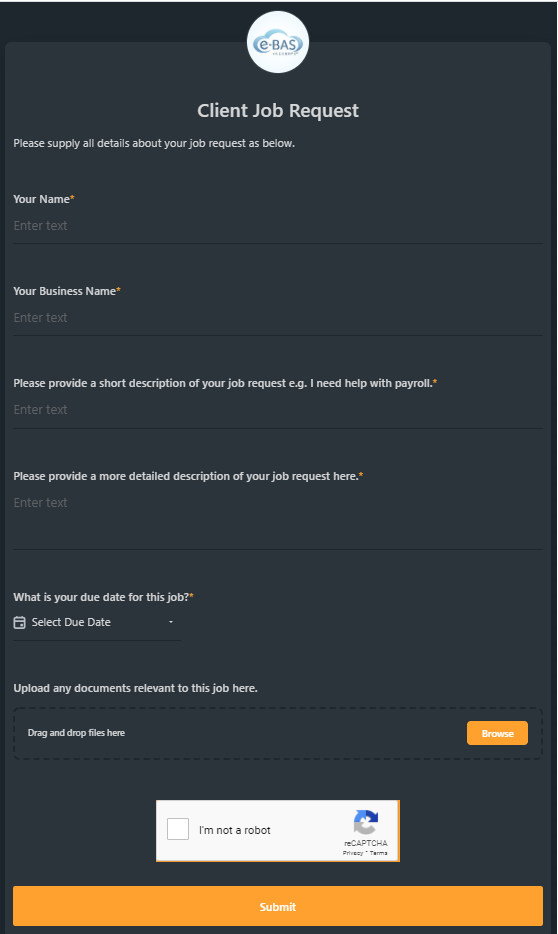
    We have created a form in Clickup which asks clients what their job request is about and it allows for document uploads too – here is a screenshot of the form:

    Once submitted, the form is automatically turned into a task inside the client’s folder in Clickup. Clickup then notifies us that the job has been created. The due date supplied by client on the form is marked as the due date in the task by Clickup. Any documents supplied by the client are added to the task too. There is nothing for us to do here (except the job itself, of course!). Automation is a wonderful thing!

    We have advised clients to add the link for the job request form to their favourites list for quick access at any time. We also put the form link into our email signature to give clients an alternative way to find the link quickly. Hopefully, the use of this new form will reduce the number of emails between us and our clients (and who doesn’t want less email clutter?). We may even investigate the idea of putting a button on our website for request submission…..who knows!

    The Job Request form is the start of a few new processes coming out this year. I’ll blog about this as we go along.

    Do you do something similar to the above with your clients? Does it work well? Do you use Clickup for your business? Let us know by commenting below.

    Like it? Share it!

    New year, new process – Job Requests! Read More »

    Guess what’s cool? Why, it’s the Snipping Tool!

    scissors, shears, cut-4400899.jpg

    This week I just wanted to write a quick blog about an app we’ve been using a lot here of late in the e-BAS Accounts office. It’s called the “Snipping Tool“. We’re probably a bit late to the party on this one because I’m sure it’s been around for a while, but we’re only just discovering how useful it is! It’s a Windows app so apologies to all those Apple users before we start, but I’m sure you guys probably have something similar anyway.

    Like it? Share it!

    Guess what’s cool? Why, it’s the Snipping Tool! Read More »

    Scroll to Top